How Conditional Sequences 3x Replies in 2025 (Step-by-Step)
Eugene Suslov10 Sep 2025
“This can’t be right… why is this cold email getting 3x more replies than the others?”
That was the thought running through my head the first week I started testing conditional sequences in Reply.io.
I hadn’t changed my offer.
I hadn’t rewritten my subject lines.
I just added one thing: branching logic that reacted to how each contact engaged.
Opened the email? Boom! Personalized follow-up.
Didn’t respond? Switch to LinkedIn.
Email bounced? No problem, route to WhatsApp.
At first, I thought conditional sequences were just a fancy extra for power users.
Too complex. Too much effort.
But once I saw the results?
I realized I’d been doing outreach on “easy mode” this whole time.
Now, conditional flows are baked into everything I run.
And in this guide, I’ll walk you through exactly how to use them (step by step!) to get more replies with less guesswork.
Without further ado…..let me take you back a bit.
What even is a conditional sequence?
I used to run 5 different outreach sequences at once, each for a different situation.
One for warm leads.
One for cold.
One if they connected with me on LinkedIn.
Another if they didn’t.
One for the “email bounced but maybe they’re on WhatsApp” crowd.
It worked….kind of.
But honestly, it was chaos. I was constantly juggling campaigns, moving contacts around, updating filters, and losing people between tools.
Then I discovered conditional sequences in Reply.io, and everything changed.
So, what is a conditional sequence?
Imagine this: one outreach sequence, but with branching paths based on what your contact does (or doesn’t) do.
Think of it like a “choose your own adventure” for sales.
Let’s say someone opens your email. Great! You can automatically move them into a more engaged follow-up path.
If they don’t open? No problem. They go down a different route with a different message.
Same sequence. Different outcomes.
And fully automated.
Here’s how it works (and why it’s powerful) = with conditional sequences, you no longer have to build a dozen workflows. You create one smart sequence that adjusts itself on the fly.
It all comes down to two new types of steps:
Condition step = checks if something happened (e.g., contact opened your email, accepted your LinkedIn request, or has a valid email).
Action step = does something based on that condition (like “move to another sequence”).
That’s it.
But that simple structure opens the door to a crazy level of flexibility.
Now that you know what a conditional sequence is, let’s talk about when it actually comes in handy, because once you see the real-life scenarios, it clicks fast.
But, before we move on…
When would I actually use this?
Your outbound process probably looks something like this:
Send a LinkedIn request.
Wait a few days.
Send an email.
Check if they opened it.
Check if they replied.
Check again.
Then, manually move them to another sequence if they didn’t.
It’s like sorting contacts like a caveman.
Copying and pasting names. Moving people between tools.
Constantly asking: “Did they connect on LinkedIn yet? Should I follow up here or try WhatsApp instead?”
It IS exhausting. And it won’t scale.
That’s exactly when conditional sequences started making sense.
Let’s go through a few everyday examples. You’ve probably hit these walls yourself.
1. They connect on LinkedIn… but ignore your email
You send a connection request. They accept, great! But then they ghost your email.
With a conditional sequence, you can:
Detect the LinkedIn connection
Trigger a follow-up on LinkedIn (instead of hoping your email gets noticed)
If they don’t connect, switch to email or WhatsApp automatically
No switching tools. No second-guessing. The system adjusts in real-time.
2. Their email bounces
You’re mid-sequence and suddenly…bounce. Before, that meant stopping everything.
Now?
Use a condition to check email validity
If invalid, skip email steps and jump to LinkedIn or call outreach
You don’t lose the lead = you just route around the problem
3. They open your email… but don’t reply
Here’s where things used to get messy for me. I’d see they opened my email three times but hadn’t replied. Do I follow up? Wait longer?
Conditional sequences let you:
Monitor email opens over a few days
If opened but no reply → Send a softer nudge
If no open → Try a different subject line or channel
It’s like having outreach radar built into your workflow.
Once you get the hang of conditions, you’ll start thinking in signals. Here are a few more I now use all the time:
Has LinkedIn URL → If yes, prioritize social selling
Email validated = false → Skip email, go multi-channel
Status = Active → Engage quickly with a tailored message
Email replied? → Move them to a nurture or booked demo flow
Did they view the email? → Great time to follow up while you’re top of mind
Every time you spot a pattern, ask: Can I build a condition for that?
Chances are, you can.
You’ve seen where it’s useful. Now let’s break down how the branching actually works under the hood (don’t worry, it’s simpler than it sounds).
How does the branching logic work?
Let me paint the picture.
Remember those old “Choose Your Own Adventure” books?
You’d read a page, hit a decision point, and get two choices:
Go into the cave = turn to page 42
Run away screaming = turn to page 57
That’s exactly how branching logic works in conditional sequences.
Just with a lot fewer dragons, and a lot more replies.
In Reply.io, each condition step checks something.
For example: Did they open the email?
Once the condition runs, your sequence splits into two paths:
✅ If YES → the contact moves to one branch
❌ If NO → they go down the other
Each of these branches starts a new step, and those steps get special numbers:
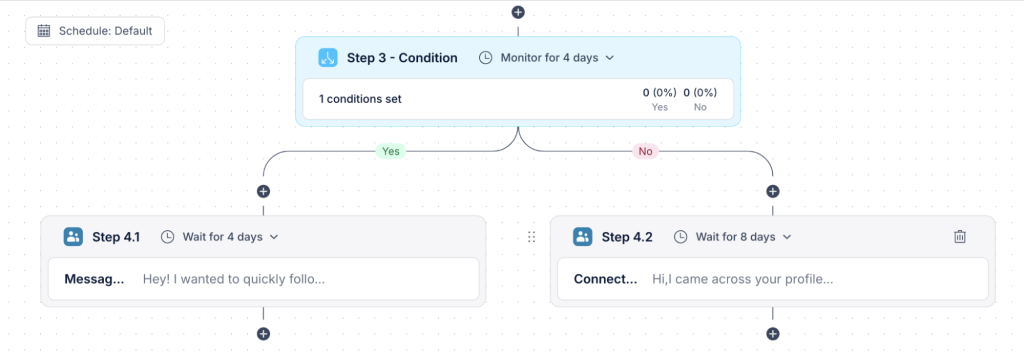
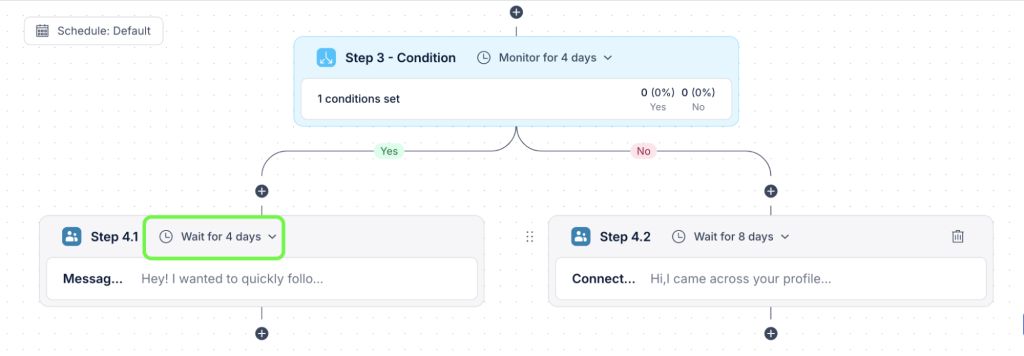
Let’s say Step 4 is your condition:
If the answer is YES → the sequence continues with Step 4.1
If it’s NO → it moves to Step 4.2
Simple, right?
And you can keep branching again from those paths. So:
Step 4.1 could lead to 5.1
Step 4.2 could go to 5.2… and so on
You can build entire “mini-journeys” inside your outreach, each one adapting to what the contact actually does.
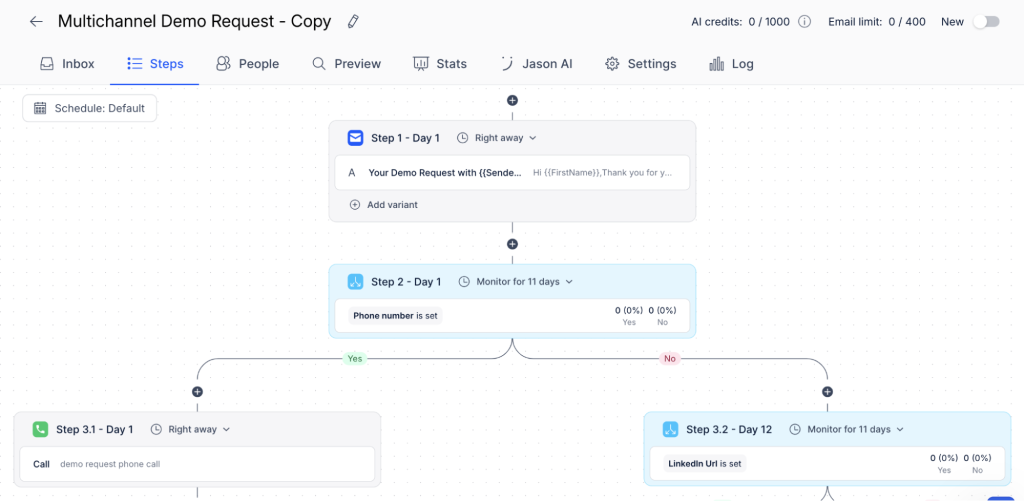
Here’s a quick example from my own workflow. I run a multi-channel sequence that starts with a LinkedIn connection.
Here’s the basic structure:
Step 1: Send LinkedIn request
Step 2: Wait 3 days
Step 3: Add a condition → “Did they connect on LinkedIn?”
✅ Yes (Step 3.1) → Send a LinkedIn DM
❌ No (Step 3.2) → Switch to email outreach
Then each path continues on its own with different content, same goal: getting a response.
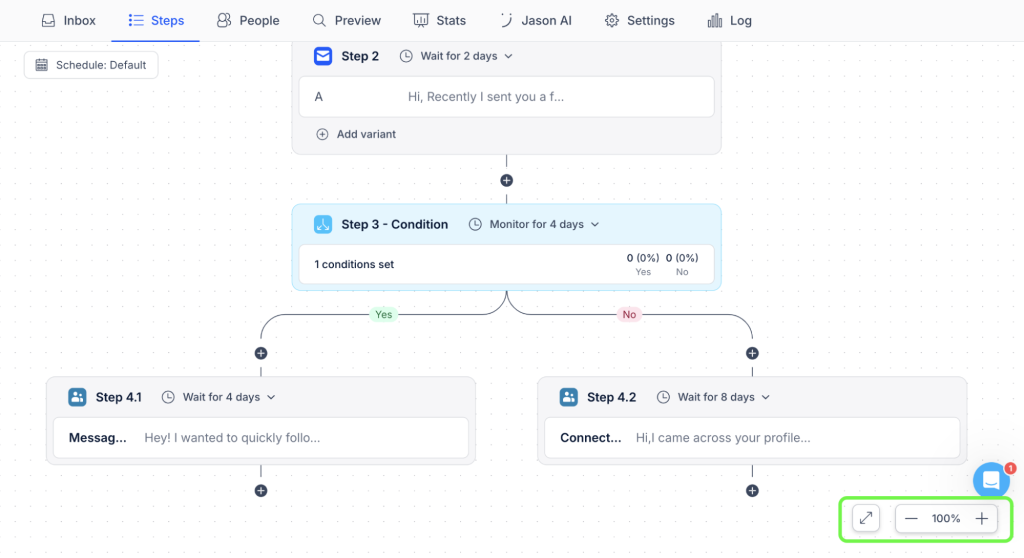
Once you start building smart sequences, they grow fast.
Suddenly, you’ve got branches inside branches, and you’re zooming in and out, trying to follow the logic.
That’s where Reply.io’s visual builder really helps:
Zoom in/out to see detail or the full map
Full-screen mode gives you a bird’s eye view
Every path is clearly numbered, so you always know what comes next
It feels like stepping back to look at your campaign from above.
You see the big picture, then zoom in to tweak a specific message in Step 6.2.1 if needed.
So, how do you actually build one of those branches? Let’s walk through how to set your first condition, step by step.
The first time I added a condition to a sequence, I expected it to be clunky. Maybe even a bit technical.
It wasn’t. It was actually… kind of fun.
Like adding a smart fork in the road, one that makes your sequence react to the contact, not just follow a script.
So let’s walk through it, step by step. And you don’t need to be technical for this. Just follow along.
Open or create a sequence
Start fresh or edit an existing one (conditional steps work in both).
Click the plus (+) to add a new step
Pick where you want to branch the sequence. I usually do this right after a wait step.
Choose “Condition” as the step type
This is where the magic begins. You’ll now define what you’re checking for.
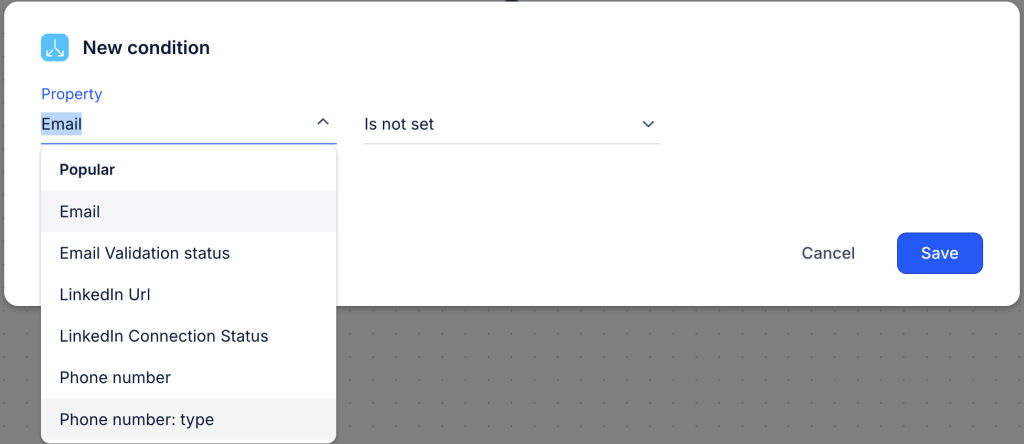
Select the condition type
You’ll see a dropdown of available conditions. Here’s a quick cheat sheet you can use when choosing your first condition.
Condition type
When to use it
What happens next
Email opened
You want to follow up if they’ve shown interest
Send a personalized or timely next step
Email replied
You want to stop automation when someone responds
Move to nurture or deal stage
LinkedIn connection = connected
You’re running multichannel outreach with LinkedIn as the opener
Follow up with a DM instead of email
Email validation = valid
You’re not sure if their email will bounce
If invalid, switch to LinkedIn or WhatsApp
Contact status = active
You only want to engage warm/qualified leads
Skip or delay unqualified ones
Has LinkedIn URL
You want to run LinkedIn outreach only with verified profiles
Trigger social-first branch
Pick the one that fits the flow you’re building.
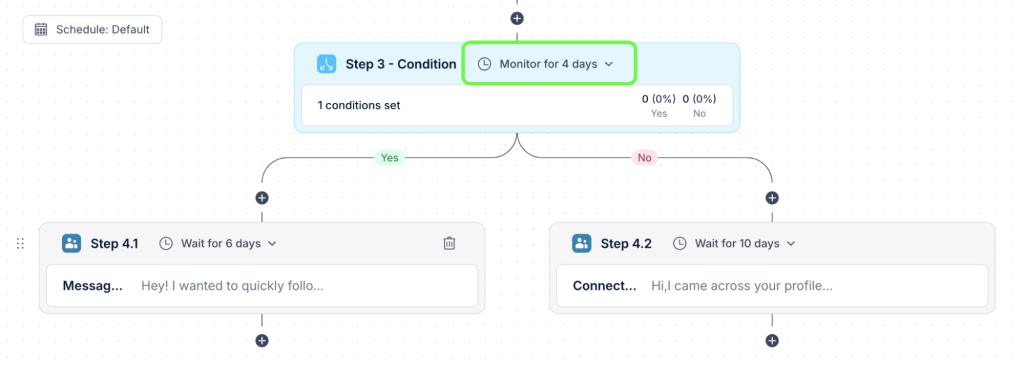
Set the “monitoring” time
This tells Reply how long to wait and check for that condition.
For example: “Monitor for 4 days to see if they open the email.”
I always give it 3–4 days for LinkedIn connections and email opens. Anything less can miss the slower responders.
P.S. We’ll dive into more details about the “Monitor for” feature a bit later, keep reading!
Add the follow-up steps
Once your condition is set, the sequence will split:
One path for “Yes” (condition met)
One path for “No” (condition not met)
Each gets its own step number (like 4.1 and 4.2). Add the right follow-up for each path.
That’s it. You’ve just built dynamic logic into your outreach.
As extras, let me save you some troubleshooting hours:
Double-check your filters → If you’re checking status (like “Active” or “Not Contacted”), make sure your CRM or contact list is clean. I’ve had sequences stall because someone was marked “Paused” without me noticing.
Use clear naming → When your sequence grows, it’s easy to lose track. I always label steps like: “3.1 = If connected” or “4.2 = No email open → Try WhatsApp.”
Start simple → Don’t try to build a 12-branch logic tree on day one. Add one or two conditions, see how they work, then expand from there.
Preview before launching → Use the visual builder to zoom out and walk through your flow like a contact. If it feels clunky, it probably is. Tweak until it flows naturally.
Once your condition’s in place, you might wonder: “Okay… but how does it know when to move someone?” Let’s answer that.
Still, we have something to add…
How does the system know when the condition is met?
This part blew my mind when I first saw it in action.
I always wondered: “Okay, cool, I’ve set a condition… but when does it actually trigger? How does it know?”
Turns out, the system uses something called “Monitor for.”
Think of it like setting a gentle alarm.
Not loud. Not pushy.
Just quietly checking in (over and over and over…) until something happens (or doesn’t). Here’s how it works:
When you set a condition, you also choose how long you want to monitor for that action.
Let’s say you’re waiting to see if someone opens your email.
You set it to “monitor for 4 days.”
Behind the scenes, Reply checks every 10 minutes to see if that person opened the email.
No rush. No pressure. Just quiet, consistent monitoring.
And then, the moment they open it = they immediately move to the next step on the “Yes” path.
In one of my outreach sequences, I send a cold email, then monitor for an open:
Step 2: Send cold email
Step 3: Condition → “Email opened?”
Monitor for 3 days
If opened → Step 3.1 → Send personalized follow-up
If not opened after 3 days → Step 3.2 → Try LinkedIn instead
One time, a lead opened my email at 2AM on the second night.
The system noticed it, and by morning, they were already in the personalized follow-up path.
No delay. No manual checking.
Just smooth, automatic progress, while I was asleep.
Not sure how long to monitor for? Here’s a quick guide based on what’s worked best in my own sequences.
Condition type
Suggested monitor time
Why it works
Email opened
2–3 days
Gives time to open without dragging out the sequence
Email replied
1–2 days
If they reply, you want to respond fast
LinkedIn connected
4–5 days
People don’t always accept immediately
Has valid email
Immediate (no monitor)
Use this just to check before email steps
Contact status is active
Immediate (no monitor)
Typically used as a filter before launch
The last question you might have is, “Why “Monitor for” matters?” Easy!
Without it, you’d have to guess when to move people forward.
Or worse: follow up too soon and seem pushy.
But with “Monitor for,” you get to:
Give people time to engage
Let the system watch for signals
Move them forward the moment something happens
It’s the difference between static automation… and responsive outreach.
What’s the difference between ‘monitor for’ and ‘wait for’?
This one tripped me up at first. Both sound like “waiting,” right?
But they behave very differently inside your sequence.
Once I understood the difference, my timing got way more intentional, and my replies went up.
Let me break it down for you.
Simple analogy time = think of it like this:
Monitor for = “Watch and react if something happens.”
Wait for = “Just pause for a bit, no matter what.”
They’re both delays. But only one is actively paying attention.
Let me share with you a real-world example. Let’s say you just sent a cold email. Now you want to:
Give the person 3 days to open it
If they open it, follow up right away
If they don’t, try something else
This is a perfect case for Monitor for.
You tell Reply: “Hey, keep an eye out for 3 days. If they open it, move them to Step 4.1. If not, send Step 4.2 on day 4.”
The system checks every 10 minutes. The moment they open it = they move forward.
Now let’s talk about Wait for. This one’s simpler. No checking. No reacting.
It just… waits.
Imagine you want to give a contact a breather before following up, no matter if they’ve replied or not.
You might say: “Wait 2 days, then send the next email.”
This is just a buffer. It doesn’t care what the contact does. It just gives space between steps.
Here’s a quick visual comparison:
Feature
Monitor for
Wait for
Checks for action?
✅ Yes – checks every 10 minutes
❌ No – just pauses
Reacts early?
✅ Moves forward the moment it happens
❌ Always waits the full time
Best for…
Conditional steps (e.g., “Did they open?”)
Natural delays or cooldowns
When I use each (and why):
I use “Monitor for” when I care if someone takes action. Like opens an email, connects on LinkedIn, replies to a message.
I use “Wait for” when I just want to pause. Maybe after a reply, or between touches on different channels.
I always use “Wait for” between a LinkedIn touch and an email. It gives just enough room to feel human, not robotic.
Now that you know how it works, what if you make a mistake? Don’t worry, I’ve been there. Here’s how to clean things up safely.
How do I clean things up if I mess up?
I’ve deleted the wrong branch more times than I’d like to admit.
One time, I thought I was just trimming a little “No reply” path…
Next thing I knew? I’d accidentally deleted the entire condition and everything beneath it.
Poof.
Gone.
Like I’d axed the whole tree because I didn’t like one leaf.
So yeah…deleting steps in conditional sequences is powerful.
But with great power comes great respo…potential to panic.
Here’s how to clean things up safely.
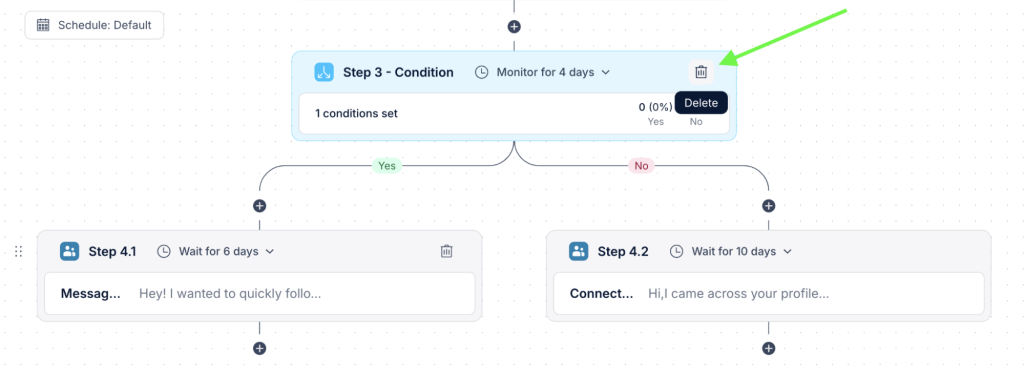
First: how to delete a step. It’s super simple.
Just hover over the step you want to remove.
In the top-right corner, you’ll see a little trash bin icon. Click it.
But wait, don’t just click and hope.
You’ll get three delete options.
Each one does something very different.
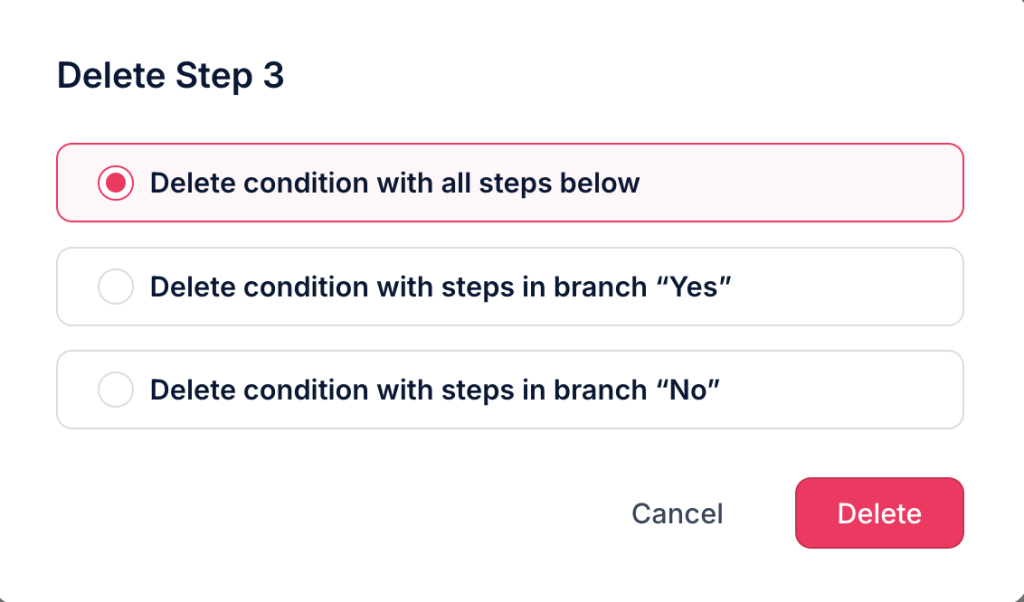
Option 1: Delete condition with all steps below
This is the nuke.
You’re not just deleting the condition. You’re wiping out everything under it.
Both “Yes” and “No” paths. Every follow-up step. All gone.
🪓 Good if: You’re starting that part of the sequence from scratch. ⚠️ Warning: Only use this if you’re 100% sure you’re done with both branches.
Option 2: Delete condition with steps in “Yes” branch
This one keeps the condition, but removes everything under the “Yes” path.
Useful if that follow-up got too messy, or needs a full rewrite.
🧹 Good if: The “Yes” logic isn’t working but you still want to keep the condition itself. ⚠️ Tip: Be sure you don’t leave a big gap afterward. Add a new step to keep things flowing.
Option 3: Delete condition with steps in “No” branch
Same as above, but it wipes the “No” branch instead.
I use this when the fallback path doesn’t need to exist anymore (like if I no longer want to chase unengaged leads on WhatsApp).
🛠 Good if: You’ve changed your strategy for contacts who don’t take action. ⚠️ Heads-up: Just like with the “Yes” branch, you’ll want to check that everything connects smoothly afterward.
To avoid deleting the wrong thing (we’ve all done it), here’s a quick breakdown of the delete options and when to use each.
Delete option
What it does
Use this if…
Delete condition + all steps below
Removes the condition and everything after it
You’re starting over and don’t need either branch
Delete condition + “Yes” branch only
Keeps the condition and “No” path
You only want to rebuild the “Yes” follow-up
Delete condition + “No” branch only
Keeps the condition and “Yes” path
You’re dropping the fallback path but keeping the main one
And a few quick cleanup tips from experience:
Zoom out before you delete → Sometimes what feels like a tiny branch is actually connected to a lot more steps than you think.
Rename steps clearly → It’s way easier to clean up when your sequence is labeled clearly (e.g., “4.1 = If opened” vs. “4.2 = No open → Try LinkedIn”).
Don’t panic → Worst case? Duplicate the sequence first, then clean the duplicate. That way, nothing’s lost for good.
Once your sequence is live and running smoothly, it’s time to track the results. Here’s how to see what’s working and what’s not.
How do I track what’s actually working?
This is where conditional sequences really earn their keep.
You’ve built your beautiful branching flow. Now it’s time to answer the real question:
Is it actually working?
I’ll be honest…this is the part I check like I check the weather.
Quick glance. Every morning.
Not because I’m obsessed, but because the insights are pure gold.
And Reply makes it easy to see which paths your leads are taking.
Start with these two spots:
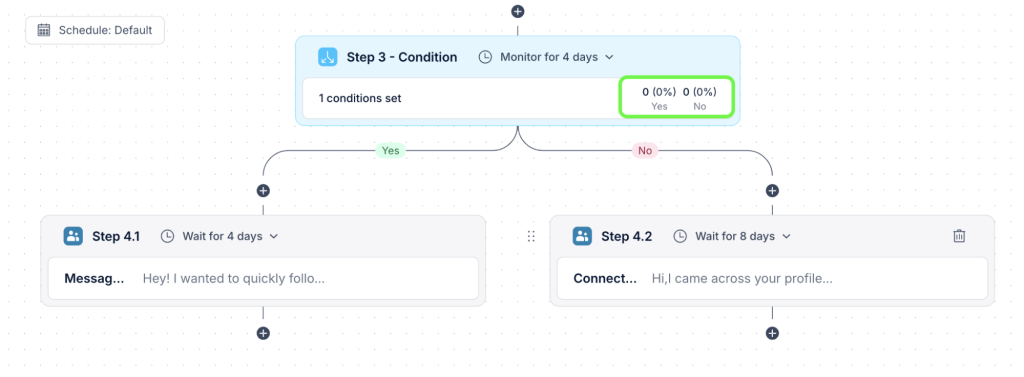
1. The Stats tab
This gives you a visual breakdown of your sequence.
You’ll see:
How many contacts went down each step
Percentages for every branch (e.g., 30% went to 4.1, 70% to 4.2)
Performance metrics for each action (opens, replies, etc.)
I treat this like a quick dashboard. In 10 seconds, I know if a step is pulling its weight or falling flat.
2. The People tab
Want to zoom in and see who went where? This is your go-to.
You’ll see:
Which step each contact is currently on
Their full path through the sequence
Whether they triggered a condition or got stuck somewhere
This is especially useful for spotting patterns. Like, “Wow, all my high-value leads are getting stuck in the No branch…why?”
Also, one of the best things about conditional logic?
It’s like running a built-in A/B test.
If you notice most people are ending up in the “No” path (say, they’re not opening your email or not connecting on LinkedIn), then it’s probably time to tweak something:
Shorten your subject line
Change your intro message
Switch channels sooner
You’re not guessing anymore. You’ve got the data.
And, if one branch is clearly outperforming the other, don’t just keep watching. Optimize the underperforming one.
Here’s another quick scan-and-fix guide I use to debug underperforming sequences.
Red flag
Possible cause
Quick fix
Low replies after “Yes” branch
Message isn’t relevant or clear
Rewrite the follow-up to feel more personal
No one hits the “Yes” path
Condition may be too strict or misconfigured
Double-check filters and monitor settings
Too many contacts stuck in “Wait” step
Delay may be too long or unnecessary
Shorten the delay or use “Monitor for” instead
One channel always underperforms
It may not fit your audience or message
Test a different step type (e.g., LinkedIn → email)
Drop-off after action step (e.g. move to sequence)
Sequence gap or bad timing
Make sure next sequence starts smoothly
Want my personal experience? Every morning (right after I check my calendar at 9AM) I pop into the Stats tab.
It takes me less than a minute. But it tells me:
What’s working
What’s lagging
Where to focus next
No deep dive. No reports.
Just a quick pulse check to keep things sharp.
Thinking, “This is great, but I already have a good sequence”? You’re not alone, and no, you don’t need to start from scratch. Yet, if you’re ready to start…
What if I already have a sequence I like?
Let me guess: you’ve already got a sequence that works. Maybe it’s not perfect, but it brings in replies and feels dialed in.
Now you’re wondering: “Do I have to rebuild this whole thing just to use conditional logic?”
Good news: you don’t.
You can keep what’s working and simply level it up.
I was hesitant too. I had a top-performing sequence that I’d tested and tweaked over months.
The last thing I wanted was to tear it apart and rebuild it just to try something new.
Here’s what I did instead (and what I recommend you do too):
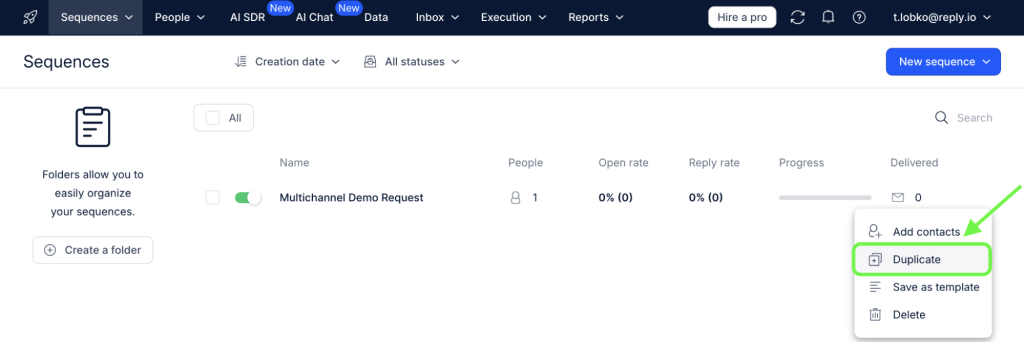
1. Duplicate the sequence
In Reply, go to the sequence you love. Click the three dots → Duplicate.
This gives you a safe copy to experiment with.
No risks. Your original stays untouched.
2. Open the duplicate and add your first condition
Pick a spot where a condition would naturally fit…maybe after an email step or a LinkedIn connection request.
For example: “Did they open Email 1?”
If yes → Send a personalized follow-up
If no → Try a different subject line or move them to another channel
3. Add branching steps from there
You don’t need to convert the entire thing right away.
Start with one or two condition points. Keep the rest of the flow the same.
4. Test it with a small group
Before rolling it out to your full audience, test it with a segment of your list.
I usually pick 30–50 leads just to see how they move through the branches.
This helps you spot any weird logic gaps before it goes wide.
Whenever I find a sequence that’s converting decently, I make a duplicate and start experimenting with conditions.
I try one small change at a time, then watch the results in the Stats tab.
If the numbers go up? Great.
If not? I adjust and try again.
It’s low-risk, high-reward.
So, is it all worth it? Let me wrap this up with a few honest thoughts from my own experience.
Is it worth the setup?
Let me be real with you.
The first time I looked at conditional sequences, I thought, “This feels like overkill.”
I already had working outreach.
I was getting replies. I didn’t need branching paths and smart conditions… right?
But now? I wouldn’t run outreach without it.
Here’s why.
It’s not about complexity. It’s about clarity
Yes, conditional sequences take a bit more effort up front.
But that effort pays off in big ways:
Cleaner workflows → You stop juggling multiple sequences and duct-taped logic. Everything’s in one smart flow.
More relevant touchpoints → You’re no longer just sending steps. You’re reacting to what your contacts actually do. That builds trust, faster.
More replies (and fewer headaches) → When people get messages that feel timely and personalized, they respond more. Period.
The more you play with it, the more it clicks. Because you don’t have to be a power user from day one.
Start small:
Add one condition
Test it with a short branch
Watch how contacts move
Adjust and grow
Soon, you’ll catch yourself thinking in branches naturally: “If they opened, say this. If not, try LinkedIn. If they reply, move them to nurture.”
And it becomes second nature.
My final advice?
Don’t overthink it.
Just try it.
Copy a sequence you already like, add one smart condition, and run it on a small list.
You’ll see the difference almost immediately.
Conditional sequences don’t just help you automate. They help you connect better.
And that’s what modern outreach is really about.
P.S. Honestly….if you’re already using Reply, this is your sign.
Open up a sequence, drop in a condition, and just play with it.
You don’t need to be perfect, just curious.
Subscribe to our blog to receive the latest updates from
the world
of sales and marketing. Stay up to date.
Related Articles
How to Know If Someone Read Your Email: Step-by-Step Guide
")