How to Get the Most Out of LinkedIn Sales Navigator | 2025
Eugene Suslov24 Jul 2025
LinkedIn Sales Navigator is packed with features, but if you’re not sure how to use them, it’s easy to feel overwhelmed. But you won’t have to spend hours digging through settings to get the most out of it = this guide will walk you through everything.
You’ll learn how to get the most out of LinkedIn Sales Navigator and in a way that makes your outreach smarter, faster, and way more personal. We’ll focus on real, practical steps you can take (right now!) to find better leads, build genuine connections, and start more valuable conversations.
We’ll cover how to:
Set up your account so leads come to you
Use advanced search filters to find your perfect prospects
Send messages that get replies (without being pushy)
We’ll also show you how to stay organized, track outreach, and spot warm opportunities before others do.
Plus, you’ll get real examples, quick Sales Navigator tips, and easy-to-follow actions along the way.
Ready to learn more? Then let’s get started.
But before we dive into the details, let’s quickly define what LinkedIn Sales Navigator actually is.
What is LinkedIn Sales Navigator and why use it?
Sales Navigator is LinkedIn’s premium tool built for people who need more than casual networking. It’s designed for sellers, recruiters, and marketers who want to find high-quality leads and actually start conversations that lead somewhere.
How’s it different from regular LinkedIn?
While standard LinkedIn gives you basic search and networking tools, Sales Navigator takes things several steps further. You get access to deeper filters, smarter lead suggestions, and real-time updates on the people who matter most to your outreach.
In 2025, it’s more powerful than ever. You’ll see AI-based recommendations that highlight high-intent leads, so you’re not wasting time on dead ends.
It also sends alerts when prospects change jobs or engage with relevant content, perfect for timing your outreach. Plus, the inbox now includes Smart Replies and message read-tracking to help you manage follow-ups more efficiently.
This year, LinkedIn also rolled out a cleaner interface and tighter CRM integration, making it easier to stay organized and focused on the right people.
So, who will benefit most from this tool? Let’s take a look. But, before we dive too deep…
Who should use Sales Navigator?
If your job involves finding people, building relationships, or closing deals, Sales Navigator is for you.
It’s not just for sales reps, nope! It’s for anyone who needs better outreach and more results.
Still, here’s who gets the most value:
Sales teams, B2B pros, and account managers who need to identify decision-makers and grow their pipeline
Recruiters looking to discover top talent faster and engage them before the competition
Different roles use it in different ways. A B2B sales rep might track buyer intent and set alerts for job changes. A recruiter could filter candidates by skills, location, and recent activity. A marketer might build lists of engaged leads based on content interaction or company growth.
Now let’s dive into the practical side and walk through, step by step, how to get started with the tool.
How do you get started with Sales Navigator?
Getting started with Sales Navigator is easier than you might think. Just follow a few simple steps to get it working for you right away.
Step 1: Sign up for Sales Navigator
Head over to LinkedIn and choose a Sales Navigator plan.
Not sure which one to pick? Start with the free trial = it gives you full access to explore all the features without spending a dime.
If you’re part of a team (sales, recruiting, or partnerships), the Advanced or Advanced Plus plans are worth checking out.
They include extras like shared lead lists, CRM integration, and collaboration tools that make group workflows a breeze.
Step 2: Polish your LinkedIn profile
Sales Navigator pulls directly from your LinkedIn profile, so make sure yours is ready to impress.
Here’s what to focus on:
Use a clear, professional photo (yes, first impressions still matter).
Craft a headline that tells people who you help and how you help them.
Fill out your About section with a short, keyword-rich summary.
Add key experience and skills your ideal client or candidate might search for.
A strong profile builds instant trust, especially when someone checks you out after you show up in their lead feed.
Step 3: Connect your tools
Once your profile’s set, it’s time to sync your systems, like your CRM (such as HubSpot, Salesforce, or Pipedrive).
This unlocks powerful features like:
Tracking messages and replies inside Sales Navigator
Auto-logging calls and emails to your CRM
Avoiding double outreach (no awkward repeat messages)
With everything synced, your pipeline stays cleaner and your follow-ups get faster and smarter.
Getting set up only takes a few minutes, but it lays the foundation for better results. Once everything’s set up, it’s time to take action. Let’s go over the next steps.
How do you build targeted lead lists?
Once your Sales Navigator account is set up, it’s time to put it to work and building the right lead lists is where the magic happens. Sales Navigator makes this part easy, as long as you know how to use the filters well.
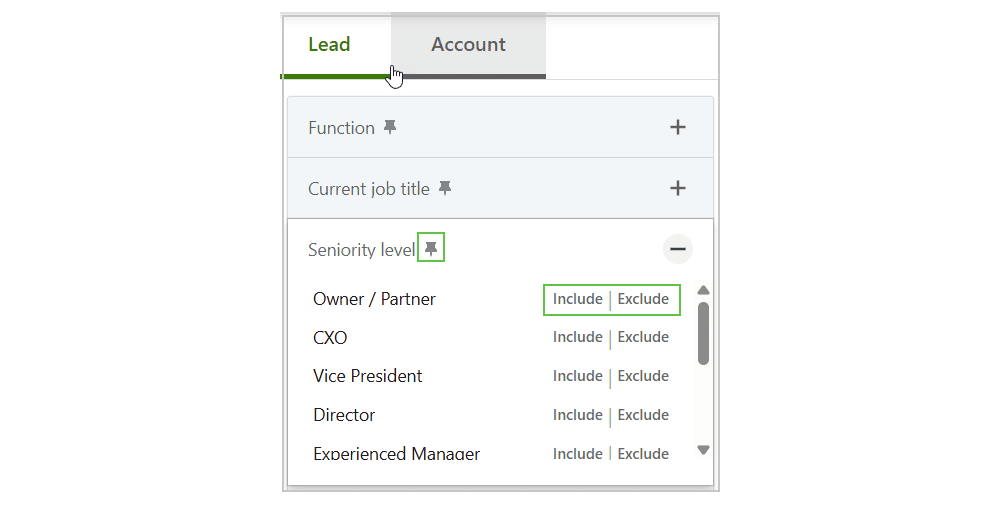
Start by heading to the Lead Search page.
From there, use the advanced filters to narrow things down. You can search by location, job title, company size, industry, seniority level, years in the current role, or past company experience.
Want to go deeper? Use a Boolean search in the keyword field. This lets you combine terms with AND, OR, and NOT. For example:
“marketing director” AND SaaS
“VP of Sales” NOT recruiter
It’s especially useful when targeting niche roles or mixed job titles across industries.
Need help with filters? Don’t worry. Here’s a cheat sheet with simple examples to help you build smarter lead lists, faster.
Filter type
Example
When to use
Title
“Head of Marketing”, “VP of Sales”
Find decision-makers
Company headcount
51–200, 201–500
Target mid-sized businesses
Geography
United States, Germany
Focus by region
Industry
SaaS, Healthcare
Narrow by sector
Seniority
CXO, Director
Prioritize leadership roles
Keywords (Boolean)
“marketing director” AND SaaS
Refine results using logic
Once you’ve got a solid list, save those leads. Sales Navigator lets you organize both people and companies into lists. You might create separate ones for industries, regions, or campaigns. These lists make it easy to track progress and follow up at the right time.
Also, you can click “View similar” on a great lead’s profile. Sales Navigator will show you others with similar roles and experience. It’s a quick way to expand your list with quality contacts.
With the right filters, Boolean know-how, and saved lists, you’re no longer just searching.
You’re building a system.
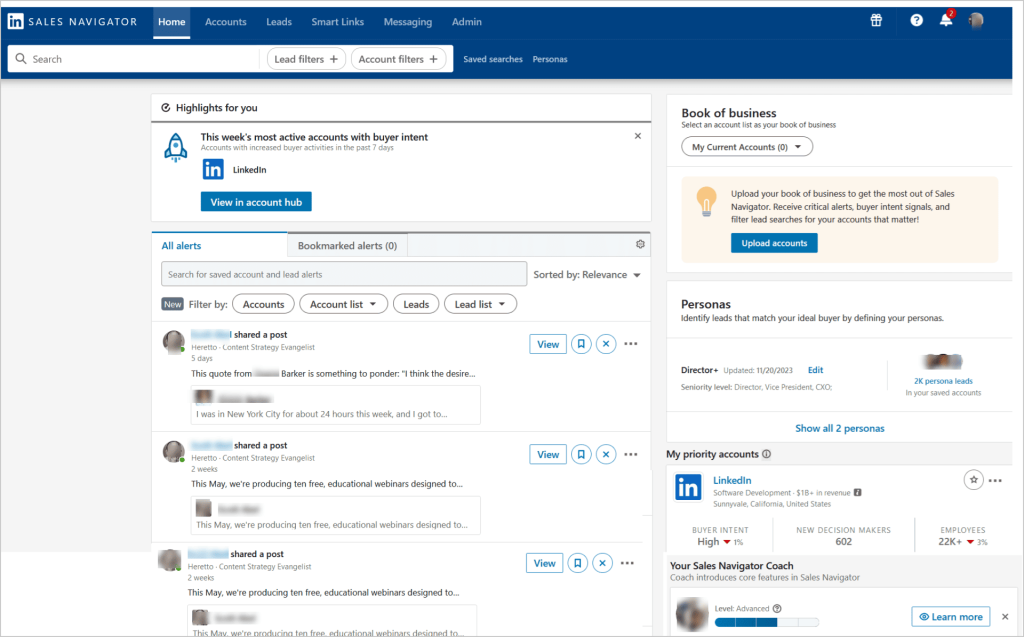
How do you use the homepage and alerts?
When you’ve built your lead lists, your Sales Navigator homepage becomes your command center. It’s more than just a dashboard = it’s where you spot real-time signals and chances to engage.
The homepage gives you:
Job changes or promotions → Congratulate them and offer support in their new role
New content shared → Comment or message with a question to spark a real convo
Company funding or growth news → Reference it as a reason your solution might help now
Hiring announcements → Suggest a helpful resource or offer to connect them with talent
Leadership changes → Great moment to introduce yourself as a fresh voice
These updates are perfect conversation starters and help you reach out with perfect timing.
To make the most of this feed, customize it. Remove companies or leads you no longer care about. Prioritize your top accounts. Hide irrelevant updates. Over time, Sales Navigator will learn what matters to you and show more of it.
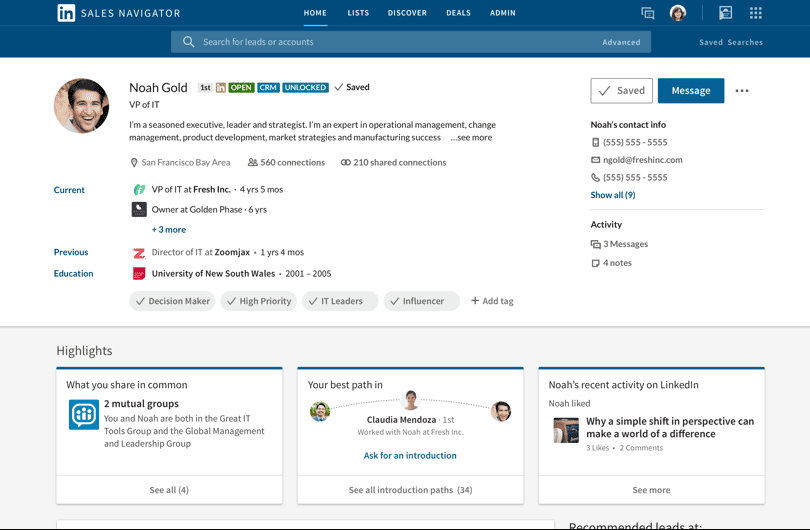
How do you use lead and account pages effectively?
Now, when you’ve found a potential lead, don’t just hit “connect” and move on.
Take a few minutes to dig into their lead page: this is where you’ll find the information that makes your outreach stand out.
Each lead page gives you a snapshot of the person’s professional world. You’ll see their job title, company, and location, how long they’ve been in their current role, and where they worked before, shared connections, recent posts, and activity.
Use this info to spot conversation starters. Maybe they’ve recently shared an article you can reference, or just got promoted = great reasons to reach out with something more personal.
Now switch over to the account page. This is where you gather company-level insights. It helps you understand the broader picture: how the business is growing, what they care about, and who else might be worth contacting.
Key things to look for:
Company size, industry, and recent news
Hiring trends or department growth (a sign they may need your solution)
Other leads at the same company you can add to your list
This extra research takes just a few clicks but makes your message way more relevant and way more likely to get a response.
How do you engage with prospects the right way?
Let’s say you’ve found a great potential client.
The next step is to start a conversation that actually gets a response. In 2025, attention is short and inboxes are full, so your message needs to be both relevant and respectful of their time.
To make sure your message doesn’t get ignored, keep these best practices in mind:
Keep it short (3–4 sentences is plenty)
Make it personal – reference something real about them
Lead with value, not your pitch
End with a friendly, low-pressure CTA (like “worth a quick chat?”)
Follow up once if you don’t hear back (people get busy – it’s not personal)
There are two main approaches:
Soft outreach: Ask a thoughtful question or comment on something they’ve done. It’s great for warming up cold leads.
Direct outreach: Clearly state why you’re reaching out, what you offer, and how it helps. Just keep it friendly, not pushy.
Using shared connections or mutual interests makes a big difference. Mentioning a mutual contact or being part of the same LinkedIn group adds instant credibility and helps your message stand out.
And when it comes to follow-ups, space them out. Don’t chase – check in with a helpful update or new insight. Keep the tone light and positive. You’re building a relationship, not closing a deal on the first message.
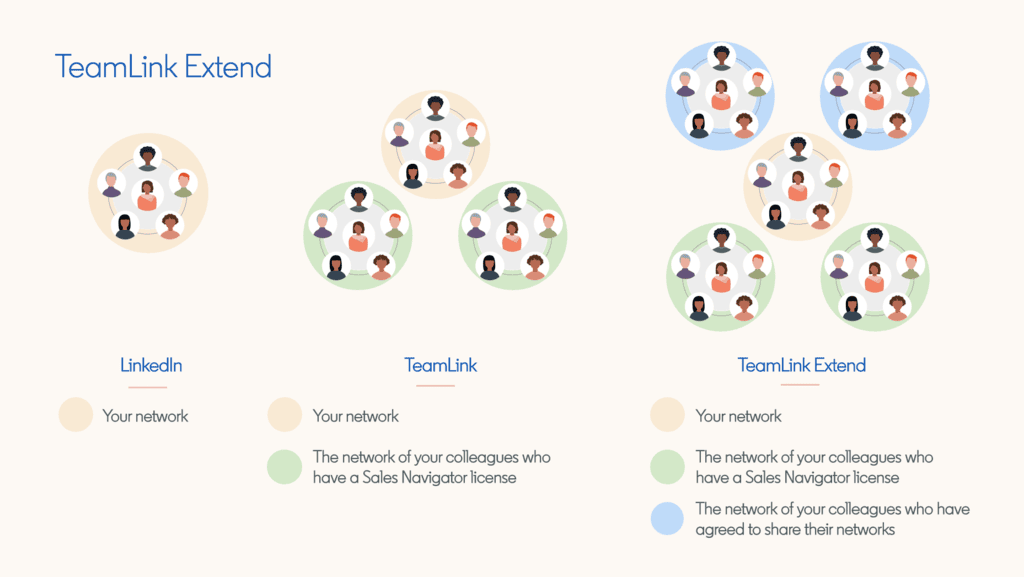
How can you use TeamLink and shared connections?
Sometimes the best way to reach someone new is through someone you already know. That’s where TeamLink comes in. It’s a feature inside Sales Navigator that shows you who on your team is connected to the lead you’re trying to reach.
Here’s how it works: when you view a lead’s profile, TeamLink highlights mutual connections across your company. These can be current teammates, past colleagues, or even people from other departments. It’s your built-in referral engine.
Instead of sending a cold message, use TeamLink to ask for a warm introduction. People are far more likely to respond when someone they already know and trust makes the first move.
When you ask for a referral, keep your request short and specific. Mention the person you’re hoping to connect with and give a quick reason why. This helps your colleague understand the context and feel confident about making the intro.
Make it as easy as possible for them to say yes. You can even offer to write a short message they can forward or tweak. Keeping it casual and low-pressure increases the chance they’ll help and speeds things up.
Using TeamLink early in your outreach strategy can save time and boost your chances of getting a reply. It’s especially helpful for reaching decision-makers or breaking into large accounts where direct messages often get ignored.
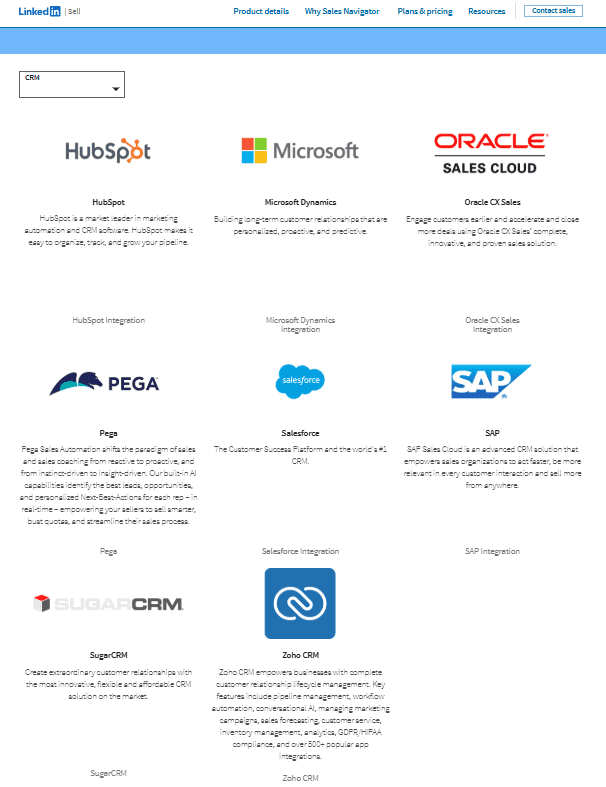
How do you integrate Sales Navigator with your tools?
Sales Navigator works great on its own, but it really shines when you connect it to the tools you already use every day. Integrating Sales Navigator helps you work faster, stay organized, and get better results from your outreach.
Let’s start with your CRM.
Sales Navigator offers native integrations with platforms like Salesforce, HubSpot, Microsoft Dynamics, and a few others. Once connected, you can view LinkedIn insights directly within your CRM. This means you’ll see profile data, lead activity, and updates without switching tabs.
Even better: you can log InMail messages, save leads, and track conversations directly from your CRM. It keeps your records clean and saves you from entering the same info twice.
Link Sales Navigator with your email outreach tools. Platforms like Reply.io, Outreach, and even Gmail work seamlessly alongside it. This lets you bring LinkedIn data into your email sequences. You’ll be able to personalize your messages with details like job changes, shared connections, or recent activity, all in real time.
Here’s where these integrations really help:
You keep lead data fresh and synced automatically
You get social context while writing or logging emails
You avoid double entry and reduce back-and-forth between tools
For example, imagine you’re reaching out to a lead through Reply.io. With the integration in place, you’ll see they just got promoted or posted about a topic you can reference. That context makes your message more relevant and more likely to get a reply.
If you’re in a team setting, integrations also help keep everyone aligned. You won’t have multiple people reaching out to the same contact, and you’ll have a clear view of who’s talked to who and when.
To set it up, just go to your Sales Navigator settings and look for the integrations tab. Most tools offer simple step-by-step connection instructions. You don’t need IT. Just a few clicks and you’re good to go.
The real benefit of integrating Sales Navigator is this: everything works together. Your CRM shows real-time LinkedIn activity. Your emails are more personalized. And your outreach becomes faster, smarter, and more efficient.
How do you track and measure success?
Using Sales Navigator effectively means more than just finding leads, it’s about staying organized and knowing what’s working. Tracking your outreach and measuring results helps you improve over time and close more deals with less guesswork.
Pay attention to the Notes and Tags feature. This is your personal system for staying on top of conversations.
Add quick notes after a call or message to remember key details. Use tags to group leads by stage, industry, or priority. This makes it easy to find the right people fast, without digging through old messages.
Sales Navigator also helps you keep track of your activity. Every time you save a lead, send a message, or view a profile, it’s logged. You can go back anytime to see what you’ve done and who’s engaged.
To really measure progress, check your dashboard metrics regularly. It gives you a snapshot of how you’re doing: number of leads saved, InMails sent, replies received, and more. If you’re on a team plan, you can also compare performance across your group.
In 2025, focus on a few key KPIs:
Metric
What it shows
Good benchmark
Leads saved
Are you building your pipeline?
15–30 per week
InMails sent
Are you actively reaching out?
5–10 per day
InMail reply rate
Are your messages landing?
20–40% is solid
Lead engagement
Who’s interacting with you?
5+ profile views/posts liked
Meetings booked
Are convos turning into calls?
2–4 per week
Follow-ups sent
Are you staying consistent?
100% follow-up rate on messages
Make it a habit to review these weekly. Look for patterns. The more you track, the more you can fine-tune.
Now that you know how to get started, let’s take a look at some additional Sales Navigator tips to help you get even more out of Sales Navigator.
What are some advanced tips and LinkedIn Sales Navigator best practices?
If you’ve already mastered the basics of Sales Navigator, now’s the perfect time to unlock its full potential. These advanced strategies will help you stay ahead, reach out more effectively, and work smarter, without making your outreach feel robotic.
Let’s go through them one by one and put them into action.
Create custom lead lists that guide your next move
Why: Generic lead lists become unmanageable fast. You need action-ready segments.
How to do it:
Go to Lead Lists → Create List
Use naming conventions like:
Fintech CEOs – US – Q3
Marketing Leaders – Series A – Warm
Segment by industry, geography, buying stage, or priority
After every search session, add only 5–10 qualified leads (not everyone who pops up)
Clone high-performing list structures for other verticals using “Copy List”
Pro Tip: Add a “Notes” column to each lead, outlining where they are in your funnel or any context you gathered.
Set alerts to catch the perfect outreach moment
Why: Sales Navigator can signal you exactly when to reach out. But only if you tell it what to watch for.
How to do it:
On each lead profile, click “Set alert”
Job change
Shared content
Mentioned in news
In Settings > Alerts, prioritize by tier:
Hot Leads
Key Accounts
In-Nurture
Daily workflow (10 mins):
Check the Alerts tab every morning
Prioritize: Who just switched roles? Who shared an article?
Use what they posted as your opener (“Congrats on the move to XYZ, noticed your post about…”)
Use smart links to see who’s engaged, and when
Why: Don’t guess who’s interested. Know it.
How to do it:
Go to Smart Links > Create Smart Link → Upload a case study, pricing doc, or video
Share via message: “Thought this case study might resonate based on [their company/role]. Let me know what stands out.”
Check views daily — Sales Nav tells you:
Who opened
When
What they looked at
Follow-up script: “Hi [Name], saw you took a look at our [Deck Name] — happy to clarify anything that caught your attention.”
Use AI-powered recommendations to uncover hidden gems
Why: LinkedIn’s AI is surprisingly good — if you train it by saving and tagging properly.
How to do it:
Go to “Recommended Leads” weekly
Each time you save a lead, tag them with ICP criteria (e.g., “SaaS CMO – Series B”)
As you save more, LinkedIn’s AI gets sharper and starts surfacing gold
Don’t just save — click through profiles to show interest (yes, LinkedIn tracks that)
Build a weekly “AI Goldmine” session: 30 mins every Friday → Review suggestions → Save top 5 → Add to correct lists
Automate tasks, not conversations
Why: Time-saving is smart. Cutting corners on personalization is not.
Smart automations:
Use Zapier to sync saved leads to your CRM
Auto-set calendar reminders for follow-ups using tools like Trello or Notion
Use Google Sheets + Sales Navigator exports for tracking movement
Avoid:
Generic “Hi [First Name], saw your profile…” messages
Full automation of connection requests or follow-ups — it kills reply rates
Better approach = use templates like this: “Hi [Name], I work with [role]s in [industry] helping them with [specific outcome]. I noticed [relevant detail from profile]…”
Personalize 15–20% of each message to make it feel truly human.
Warm up cold leads (automatically!)
Don’t wait for intros — start convos with Reply.io’s warm-up flows. Use mutual connections, content hooks, or role changes to trigger outreach that doesn’t get ignored.
Why: Consistency > Intensity. Small daily steps outperform a once-a-week push.
Morning Routine (15 min):
Open Alerts tab
Review Smart Link activity
Send 1–2 high-context follow-ups
End of Day (15 min):
Clean up lists: remove stale leads
Add notes/tags to new leads
Log learnings in a doc (e.g., messages that got replies, or objections you encountered)
Also, consider setting a weekly reminder, something like “Experiment Friday” → Test a new message angle, content piece, or Smart Link asset
And, as an extra, watch out for these common mistakes:
Over-saving leads → Focus on qualified prospects only
Forgetting to follow up → Calendar reminders are your friend
Not tagging or labeling leads → It ruins future segmentation
Relying on automation for personalization → Always customize messaging based on insights
Everything looks simple and promising and that’s great. But even in straightforward processes, it’s easy to make mistakes. Let’s look at some common ones so you can avoid them.
What are common mistakes to avoid?
Even with a great tool like Sales Navigator, it’s easy to fall into habits that hurt more than help. These mistakes are common, but they’re also easy to fix once you know what to look out for.
Mistake
Why it hurts
Fix it by…
Sending a pitch right away
Feels spammy, not human
Start with value, not a sale
Ignoring alerts
Misses perfect timing moments
Check your homepage feed daily
Letting lists go stale
Wastes time on cold or unqualified leads
Refresh lists weekly and tag by status
Skipping personalization
Feels like a mass message
Reference something specific they did
No follow-up
One message rarely does it
Send a second touchpoint 3–5 days later
These aren’t big changes, but they have a big impact. When you treat potential clients like real people (not just data) you stand out from the crowd and can build more effective communication.
Everything seems clear so far, but what else should you explore before getting started with the tool? Let’s take a look.
What resources can help you keep learning?
Sales Navigator is packed with features, and the more you explore, the more value you’ll unlock. But staying sharp takes more than just logging in. Luckily, there are tons of easy, free (or low-cost) ways to keep learning and improving.
Start with LinkedIn Learning. They offer quick, practical courses on Sales Navigator, social selling, and outreach strategy. You don’t need hours. Just 20–30 minutes a week can level up your skills fast.
The Sales Navigator Help Center is another must-have. It’s where LinkedIn breaks down features step by step. If you’re ever stuck or unsure how something works, chances are the answer’s in there, with screenshots and clear instructions.
You can also learn a lot from the community. Check out:
LinkedIn Groups focused on B2B sales, prospecting, or social selling
Newsletters from sales coaches and thought leaders
Forums like RevGenius or Pavilion where users swap tips and templates
And don’t forget about the pros who are already doing it well. Follow Sales Navigator power users – the ones who share examples, post real outreach tactics, and explain what’s working right now. Just following a few of them can give you new ideas each week.
The key is to stay curious and keep learning in small doses. You don’t need to master everything at once. But if you commit to learning just a little bit each week, you’ll stay ahead of the curve and get way more out of Sales Navigator over time.
And before we wrap up, let’s take a look at how to properly set up your workflow with LinkedIn Sales Navigator.
How do you make Sales Navigator part of your daily routine?
Using Sales Navigator once in a while won’t move the needle. The real results come when you build it into your day, just like checking email or reviewing your calendar.
Сreate a simple daily workflow. It doesn’t take much time: just up to half an hour is enough. Each day, try to:
Check alerts from your saved leads (job changes, posts, news)
Scan Smart Link activity to see who engaged with your content
Review AI-recommended leads and save any promising ones
Send 1–3 personalized InMails or warm intros
Update tags and notes for leads you’ve contacted recently
Make Sales Navigator a habit, something you naturally open each morning like your email. You’ll be faster, more focused, and always a step ahead.
Subscribe to our blog to receive the latest updates from
the world
of sales and marketing. Stay up to date.


")
