How to Use LinkedIn Sales Navigator in 2026: Expert Tips
Eugene Suslov26 Sep 2024
A lot of what we do here at Reply.io revolves around helping you get the most out of your outreach and lead-generation efforts. I mean, so much of it often feels like searching for a needle in a haystack.
There are so many moving parts, cogs to think about, a ton of competition, and always limited resources.
For most agents, optimizing every part of the process is not only a dreamy solution but a necessity if you want to secure sustainable, consistent results.
However, while there are a ton of tools, strategies, and YouTube influencers highlighting the next “ground-breaking” trend that “redefines the industry,” as it always does (right?), there’s a pretty slept-on tool that’s built into a platform you’re probably already using.
The LinkedIn Sales Navigator.
LinkedIn is already a great place to find leads. Now with over 1 billion users worldwide, all looking to get down to business, it’s already a great place to find the most suitable candidates to spend your efforts.
The LinkedIn Sales Navigator takes things a step further, giving you access to tools and features designed to help you do the job as efficiently and effectively as possible.
In this guide, I’m spilling the beans on this go-to tool, outlining everything you need to know on how to use Sales Navigator like a pro. We’ll dive deep into expert tips and actionable strategies to help you:
Uncover a goldmine of high-quality leads
Build stronger relationships with decision-makers
Skyrocket your sales and crush your targets
Let’s get into it.
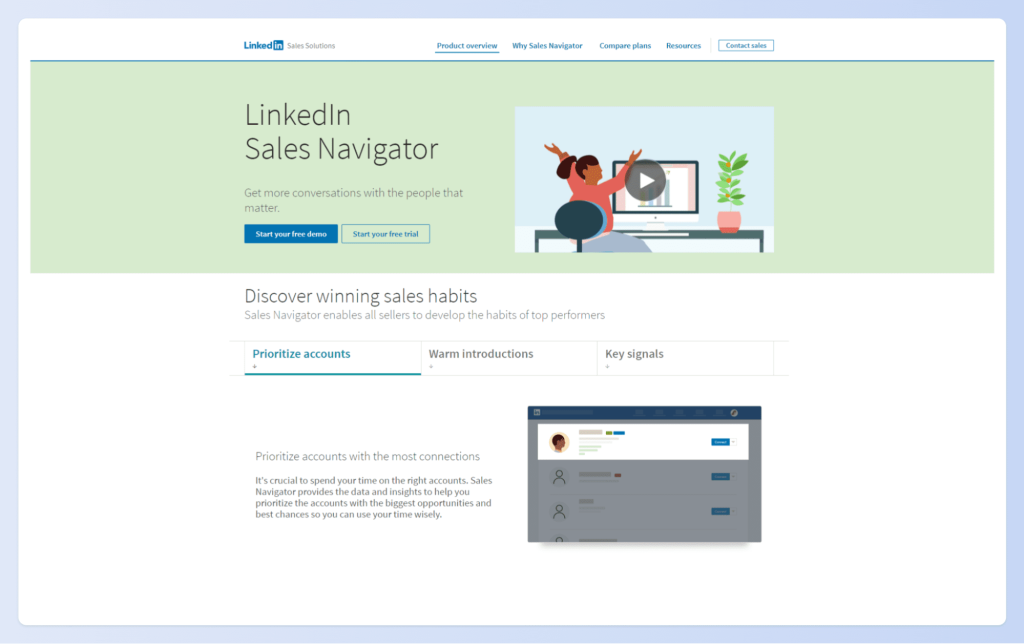
What is LinkedIn Sales Navigator (and Why Should You Care)?
LinkedIn Sales Navigator is a paid subscription service offered by LinkedIn that is designed to help sales professionals like you find and connect with potential customers.
Think of it as a turbocharged version of LinkedIn, but instead of posts, profiles, and so many executives trying to sound profound, you have a suite of features that allow you to laser focus specifically on lead generation and relationship building.
Here’s what makes it stand out:
Advanced Search: Sales Navigator gives you access to powerful search filters beyond the basic LinkedIn search. You can zero in on your ideal customers based on industry, company size, job title, interests, and a whole lot more.
CRM Integration: Say goodbye to messy spreadsheets and hello to streamlined efficiency. Sales Navigator integrates with popular CRM platforms, allowing you to keep your lead information organized and up-to-date, all automatically.
Real-Time Insights: Get the inside scoop on your prospects with real-time alerts and insights. Sales Navigator lets you know when your leads are active on LinkedIn, changing jobs, or engaging with your content.
Think of it as a toolkit to help you find, connect with, and build relationships with the right people at the right time. Of course, the more effectively you can do this, the more deals you’ll close and the more sales you’ll make.
How Does LinkedIn Sales Navigator Actually Work?
So, the brass tacks, to understand how to use Linkedin Sales Navigator, we first start with how it works.
Quite simply, the platform monitors and tracks a ton of relevant prospect data (many metrics and key points you’re probably working with already) and then continuously updates that data to keep it relevant.
This is all logged in a database in which you’ll conduct queries and thus get a list of potential prospects that are actually suitable for your goals, rather than you having to do the guesswork.
It’s like a super-powered search engine for finding your ideal customers.
Included, you’ll find things like:
Target with precision → Want to connect with CEOs in the healthcare industry located in a specific city? No problem—Sales Navigator lets you filter your searches by industry, company size, job title, location, and much more. This means you can say “goodbye” to endless scrolling and “hello” to a curated list of your perfect prospects.
Stay organized → Sales Navigator helps you keep your lead generation efforts on point. You can save leads and accounts, making it easy to track your progress and manage your outreach. It’s like having your own personal CRM built right into LinkedIn.
Unleash the power of Boolean → Ever heard of Boolean search? It’s a fancy way of saying you can combine keywords with operators like AND, OR, and NOT to refine your searches even further. This is super helpful for excluding competitors or zeroing in on a particular niche.
TeamLink → Tap into the power of your team’s network to get warm introductions to prospects. TeamLink shows you if any of your colleagues are connected to your target leads, making it easier to get your foot in the door.
Real-time alerts → Stay in the loop with real-time alerts that notify you of important changes or updates from your prospects. This helps you reach out at the perfect time with relevant information.
Account and lead insights → Get a behind-the-scenes look at your prospects’ activities and engagement. See who’s viewing your profile, liking your posts, and interacting with your content.
By using these powerful features, you can wave goodbye to random outreach and focus your energy on the prospects who are most likely to become happy customers.
Why is Sales Navigator Essential for Sales Pros?
Real simple—the Navigator takes all the guesswork out of outbound prospecting, saving you time and helping you get better, more successful results from your efforts.
Maye, you’re staring at your LinkedIn homepage and have no idea where to start.
Or you’ve had some luck, and you’ve found yourself on a director’s profile page, and some of the demographics look good, but you’re not really sure if they’ll be interested, and now you have to cold call, and you’re not really sure what to say, so you’re hoping for the best, and it all feels a bit like a shot-in-the-dark?
Well, that’s because it is a shot in the dark.
Thankfully, those days are over as the Navigator shines a lot of everything you need to make the best executive decision, regardless of whether you’re an individual or an agency.
Then, back this with the extensive list of features such as real-time alerts, CRM integration, and so on, you’ve essentially got a sales assistant that does all the heavy lifting for you.
No more manually handling hours’ worth of tasks. No more wasting your time chasing leads that don’t suit your offering.
Instead, just have a pile of filtered, optimized data in front of you, automatically sourced from one of the biggest business databases in the world. Mix this with other tools like LinkedIn’s Social Selling Index (SSI), and you’ll have full suite setting you up for success.
Sales Navigator vs. LinkedIn Premium and Free?
Now, I know what you might be thinking: “Do I really need Sales Navigator? Isn’t regular LinkedIn or LinkedIn Premium enough?“
That’s a fair question, but here’s the thing: while LinkedIn Premium and the free version are great for networking and staying connected, they simply can’t match the lead-generating firepower of Sales Navigator.
I’m not saying this is a tool that everyone should be using. If you’re trying to grow a personal brand or network, then do; it’s probably not worth it in general.
If you’re looking to sell via the lead generation and nurturing process, then yes, Sales Navigator is a no-brainer.
And the statistics back this up.
A Forrester survey commissioned by LinkedIn found that using Sales Navigator yielded a 312% return on investment over three years and paid for itself in under six months. That’s a pretty good deal through and through!
I think we should stop talking theory and move to the practical part: LinkedIn Sales Navigator, how to use it, and all the best practices, shall we?!
How to Get Started with LinkedIn Sales Navigator?
So, let’s say you’ve decided that LinkedIn Sales Navigator is for you, and you’re ready to give it a shot. Here are the simple steps of how to get started.
Setting Up Your Account
There are a few things to do before you get started with the Sales Navigator.
First, take a look at the planshere and see which one best suits your needs and budgets. They start from around $99 per month with the Core plan up to Advanced Plus, of which pricing is only available upon request.
Note: Signing up for Sales Navigator will include a LinkedIn Premium membership, so you don’t need to pay for both.
There are too many features to list here, so simply look through the features page, where everything is explained in detail.
Once you’ve chosen, click the Contact Sales button and fill out the form. A LinkedIn Sales rep will be in touch to help you set up your account. This can take up to 30 days but is usually faster.
While this is underway, I urge you to start working out the details of how you’re going to use Navigator, so you can make the most of your subscription right off the bat.
I’m talking about things like:
Defining your ideal customer: Tell Sales Navigator who you’re looking for by specifying your target industries, company sizes, job titles, and any other criteria that are important to you. This helps Sales Navigator curate a list of red-hot leads that are most likely to convert.
Polishing your LinkedIn profile: Your profile is your first impression, so make it count! Update your headline, summary, and experience sections to highlight your expertise and how you help your clients. A killer profile will make you stand out from the crowd and attract the right kind of attention.
Once you receive the email that you’re all signed up, you’re ready to learn how to use LinkedIn Sales Navigator effectively.
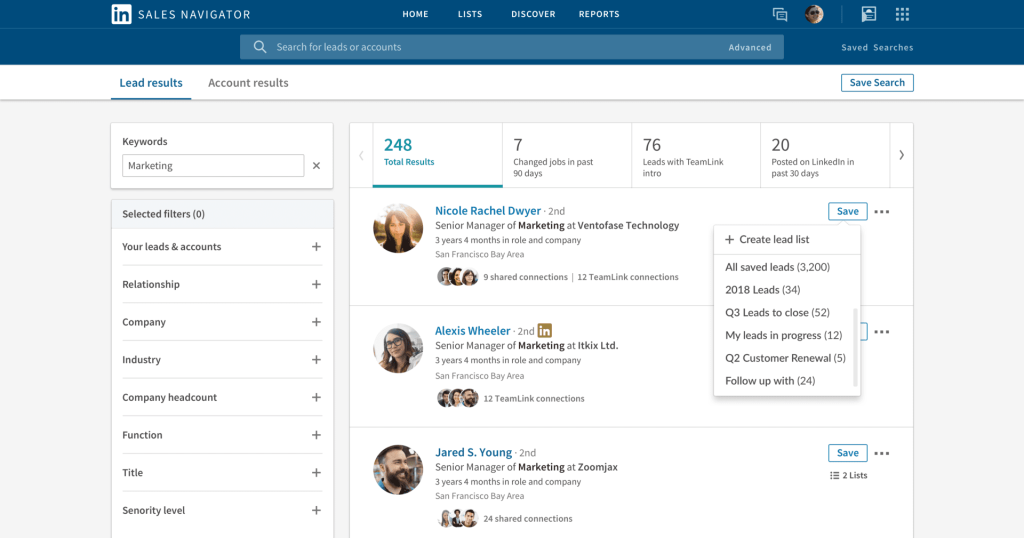
Exploring the Sales Navigator Dashboard
At any time from your LinkedIn homepage, simply click the Sales Navigator icon to head over to the dashboard. This is your mission control and where the magic happens for all things lead generation.
It’s where you’ll find everything you need to track your progress, manage your leads, and uncover new opportunities.
Here’s a quick tour of what you can expect:
Lead and account overview: Get a bird’s-eye view of all your saved leads and accounts. This makes it easy to stay organized and prioritize your outreach efforts.
The search bar: The start of any lead generation process, where you can add your specific terms and filter the results based on your preferences.
Real-time alerts: Remember those handy alerts I spoke about? You’ll find them front and center on your dashboard, keeping you in the loop on any important updates from your prospects.
Personas: Add and remove the personas of the leads you’re looking for. These are essentially profiles for your ideal buyers that the Navigator will keep an eye on. You can update the details of these personas at any time.
Account insights: Get the inside scoop on your target accounts. Sales Navigator provides valuable insights into company news, industry trends, and even potential sales triggers.
Advanced search: Your dashboard gives you quick access to Sales Navigator’s powerful search filters, so you can easily find new leads that fit your ideal customer profile.
Take some time to click around and explore all the nooks and crannies of your dashboard. The more familiar you are with its layout and features, the more effectively you can use Sales Navigator to achieve your sales goals.
Fine-Tune Your Sales Preferences
Now you’re familiar with your Sales Navigator dashboard, it’s time to personalize your experience and make it work for you. This is where customizing your sales preferences comes in.
Of course, this will take some time as you get used to using the platform, and it will suit your requirements more and more over time as you build everything up.
To start with for now, you’ll need to spend time putting in the basics. Then, you can find time to start getting results back. This process includes:
Targeting your ideal customer: Dive into your Sales Navigator settings and specify your target industries, company sizes, job titles, and any other criteria that define your perfect customer. This ensures that Sales Navigator’s recommendations and search results are laser-focused on the prospects who are most likely to become loyal clients.
Organizing your leads like a pro: Create custom lead and account lists to keep your pipeline organized and prioritize your outreach efforts. You can group leads by industry, deal size, or any other criteria that make sense for your sales process. This helps you stay focused and ensures you’re always connecting with the right people at the right time.
By taking the time to customize your sales preferences, you’re essentially telling Sales Navigator, “Hey, these are the leads I’m interested in – show me more of them!”
Again, your results will get better over time as you refine what you’re looking for and you improve your craft.
Master Social Selling on LinkedIn!
Ready to turn connections into clients? Grab our free e-book and learn the secrets to social selling on LinkedIn. Your ultimate guide to boosting sales is just a click away!
How to Use LinkedIn Sales Navigator For Lead Generation
Okay, you’ve set up your account, explored your dashboard, and fine-tuned your preferences.
Perhaps you’ve just finished giving it a go for the first time, you’ve reached out to a few people, or you’ve been using the platform for a few weeks, and you’re ready to get some proper results.
Get ready to become a prospecting pro with these expert tips:
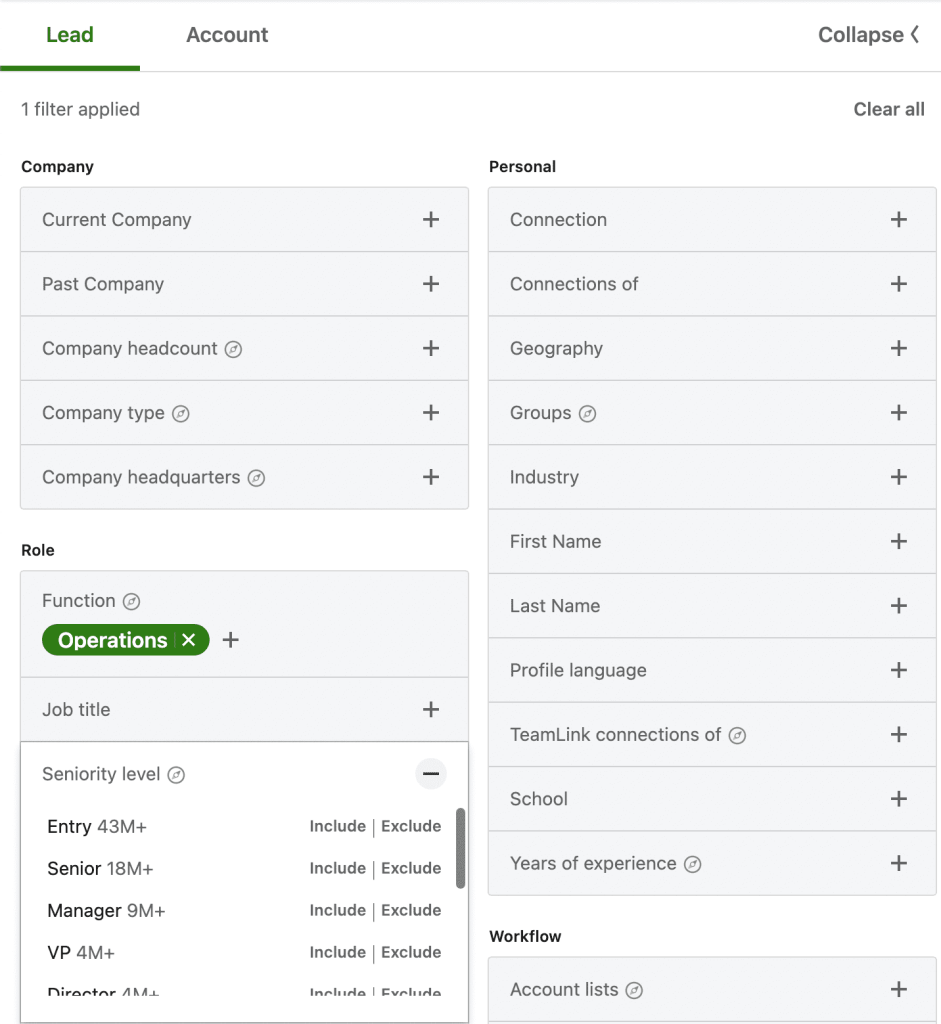
Advanced Search Filters: Finding the Right Leads
Sales Navigator’s advanced search filters are your secret weapon for finding the right leads, not just any leads. This is pretty much the bread and butter of the tool, and if you can get this right, you’ll see a huge uptick in qualified leads.
Here’s what you need to know:
Get specific: Don’t be shy—use as many filters as you need to narrow down your search. Want to connect with marketing directors in the software industry who have experience with content marketing and are located in a specific city? Go for it! The more specific you are, the more qualified your leads will be.
Think outside the box: Sales Navigator offers a ton of filters beyond the basics. You can search for leads based on their past job experiences, educational background, groups they’ve joined, and even keywords in their profiles. This allows you to uncover hidden gems and connect with people who might not appear in a standard search.
Save your searches: Once you’ve crafted the perfect search, save it for easy access later. This saves you time and ensures you’re always working with the most up-to-date lead lists.
Using Boolean Search for Better Results
Boolean search is like a secret code that lets you create super-specific search queries. If you’ve used these phrases on Google, you know what I’m talking about, and LinkedIn supports it.
If not, by combining keywords with operators like AND, OR, and NOT, you can fine-tune your searches and uncover the hidden gems you may otherwise miss.
Here’s how it works:
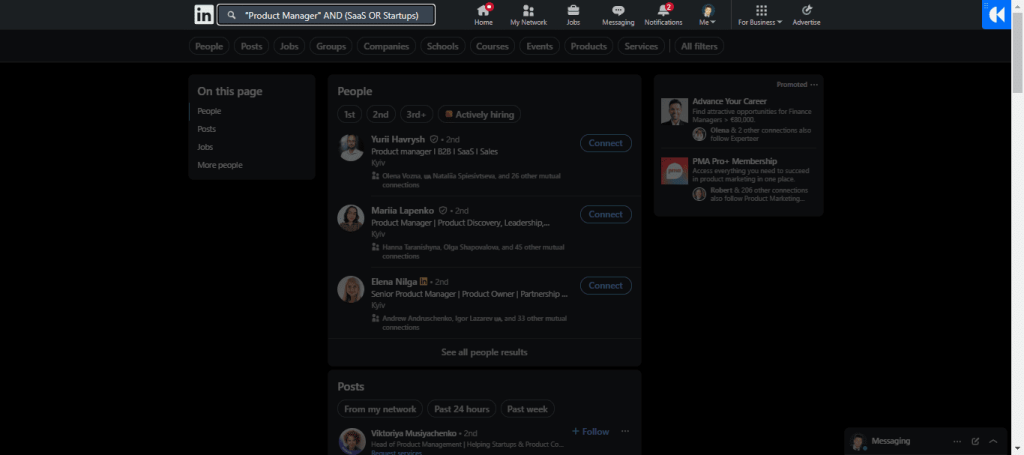
AND: Use AND to find leads who match multiple criteria. For example, “marketing manager” AND “SaaS” will show you leads who are marketing managers in the SaaS industry.
OR: Use OR to broaden your search and include leads who match one of several criteria. For example, “content marketing” OR “social media marketing” will show you leads with experience in either area.
NOT: Use NOT to exclude specific criteria from your search. For example, “marketing manager” NOT “competitor name” will show you marketing managers who don’t work for your competitors.
Quotes (“”): Use quotes to lock in exact phrases. This makes LinkedIn search for the exact words you type, in the same order. For example, “product marketing manager” gets you people with that specific job title, not just random hits for “product” or “manager.”
Parentheses (): Use parentheses to organize your search when you’re mixing terms. It helps you group things. For example, (marketing OR sales) AND “SaaS” gets you people in marketing or sales but only in the SaaS field.
This is perhaps the best way to zero in on the most qualified prospects with laser-like precision.
Creating and Managing Targeted Lead Lists
One of the biggest obstacles agents have to deal with these days is trying to navigate the absolute mess of their own work.
Don’t worry, this happens to near-enough everyone. The more work you do and the more data you collect, the messier your spreadsheets become; sooner or later, you lose track of what’s essential.
Lead lists are the answer.
Think of lead lists as your personal filing system for all those valuable prospects you’ve uncovered. By organizing your leads into targeted lists, you can stay focused, prioritize your outreach, and ensure no opportunity slips through the cracks.
Here’s how to create and manage lead lists like a boss:
Categorize your leads: Group your leads based on criteria that make sense for your sales process. You might create lists based on industry, company size, deal stage, or even level of engagement.
Prioritize your outreach: Lead lists make it easy to see who needs your attention first. Focus on those high-priority leads and tailor your outreach to their needs and interests.
Stay in the loop: Set up alerts for your lead lists to get notified of any important updates. This ensures you’re always aware of what your prospects are up to and can reach out at the perfect moment.
As I said before, try to think of the Sales Navigator as your personal assistant who keeps your leads organized and reminds you who to contact next. With any of the features here, when learning how to use LinkedIn Sales Navigator effectively, remember to let the tool do the hard work so you can focus on doing what you do best.
How to Export a LinkedIn Sales Navigator List with Findy and Reply.io
Exporting contacts from LinkedIn Sales Navigator into Reply is super easy, especially when you use the Findy Chrome extension by Reply. Just in case, you could also use the LinkedIn Sales Navigator API in Python, but we’ve got a much simpler way for you!
Here’s how you can seamlessly add contacts to your Reply lists and export them when needed.
Step 1: Install Findy Chrome Extension
First things first, make sure you’ve got the Findy Chrome extension installed. You can grab it from the Chrome Web Store.
This nifty tool helps you pull contact info directly from LinkedIn Sales Navigator into your Reply lists without a hassle.
Step 2: Search for leads on LinkedIn Sales Navigator
Once Findy is set up, head over to LinkedIn Sales Navigator and run a search for the leads or contacts you’re interested in.
You can filter your search based on job title, company size, geography—whatever criteria fit your outreach strategy.
Step 3: Use Findy to add contacts to Reply
When you’ve got your list of leads ready in Sales Navigator, activate the Findy extension. You’ll notice that Findy will recognize the profiles on the page and let you select which ones to add to your Reply lists.
Simply select the leads you want and click to add them directly into Reply.io—it’s that simple! The extension grabs essential details like name, title, and email, so you don’t have to.
Step 4: Organize your contacts in Reply
Now, hop over to Reply.io, where your new contacts have been neatly added to your lists. You can organize them into different sequences based on your outreach needs.
No matter if you’re reaching out to them via email, communicating via LinkedIn or Whatsapp, or planning follow-up messages, everything’s in one place for easy management.
Step 5: Export contacts from Reply (if needed)
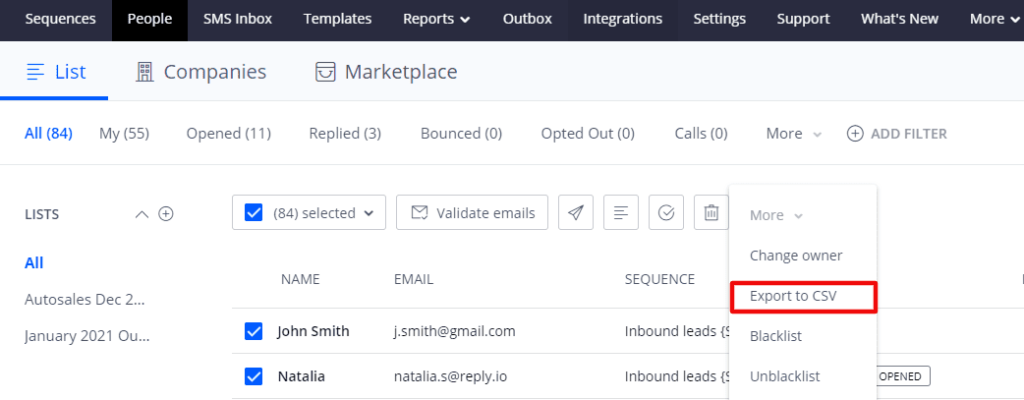
If for any reason you need to export your contacts from Reply.io (for example, to use them in another platform), it’s super straightforward.
Just go to the Contacts section in Reply, choose the list or sequence you want to export, and hit the ‘Export to CSV’ button.
You can export them in CSV format, making it easy to move your contacts anywhere you need.
Pro tip: If you’re working with larger lists, Findy’s bulk import feature saves tons of time by letting you add multiple profiles in one go. No more manual entry—just select, click, and you’re done!
In no time, you’ll have your Sales Navigator leads neatly tucked into Reply.io, ready for outreach, and easily exportable if you need to move them around. It’s all about making your workflow smoother and saving time!
Connecting with Prospects Through InMails
InMails is your direct line to connect with decision-makers, even if you haven’t crossed paths before. It doesn’t matter who you want to speak with or how many or how few your connections are, InMails get you right into that lead’s inbox.
But don’t just head out and start spamming everyone who looks slightly like what you’re looking for. InMails are a finite resource you need to use wisely for the best return.
On the Core tier, you get 50 messages per month, with 150 InMail credits being the most you can accumulate at any one time.
This means you absolutely should be saving them for the prospects that you really want to connect with and think you have a valuable offering for.
Those receiving InMails know these are limited too, so most of the time, they’re more likely to take notice because they see you’re taking an invested interest in them.
Use this to your advantage—first impressions count, so do your best. I’m talking about things like:
Personalize, personalize, personalize: Generic InMails go straight to the trash. Take the time to research your prospects and tailor your message to their specific needs and interests. Mention something you admire about their work or a challenge they might be facing.
Offer value upfront: Don’t just pitch your product or service right off the bat. Instead, offer something valuable, like a helpful resource, a thought-provoking article, or an invitation to a webinar. Show them you’re genuinely interested in helping them succeed.
Keep it concise and clear: Decision-makers are busy people. Get to the point quickly and make it crystal clear what you’re offering and how it can benefit them. You get 200 characters in the subject line and 2,000 in the body, so make it count!
Setting Alerts to Stay on Top of Your Prospects
Things change all the time in the business world, never faster than today. Therefore, seizing the right moment at the right time with the right message is everything. Your best chance at finding this time and not missing it is via the Alerts feature.
Try to think of these as your own personal news feed for all things related to your prospects.
For example, imagine getting a notification when your dream prospect mentions a challenge your product can solve or when they publish a post about a relevant industry trend.
It’s literally like fishing. You set everything up as best you can, you know you’re ready, you cast out and set up an alert, and then you wait. When that alert comes in, the float bobs and it’s time to reel in.
Here’s how to use them to your advantage:
Set alerts for key accounts: Stay in the loop on any major updates from your most important prospects. This allows you to reach out with timely and relevant information, building stronger relationships and uncovering new opportunities.
Monitor job changes and promotions: Congratulate your prospects on their career milestones and offer your support in their new roles. This is a great way to stay top-of-mind and nurture those valuable connections.
Track engagement with your profile: See who’s been checking you out and reach out to those who have shown interest in your business. This is a warm lead waiting to be nurtured.
Exporting Leads and Finding Emails
Hand in hand with the consideration above, one of the best features of Sales Navigator is being able to take your leads from LinkedIn to the inbox.
Here’s the deal:
Seamless CRM Integration: Export your Sales Navigator leads directly to your CRM with just a few clicks. This keeps all your lead information organized, up-to-date, and easily accessible. No more manual data entry or juggling multiple platforms.
Email hunting made easy: Need to reach out to a prospect who’s not active on LinkedIn, or do you want a more direct line to? Sales Navigator can help you track down their email address. This expands your outreach options and increases your chances of connecting.
By exporting leads and finding emails, you’ll streamline your workflow and ensure you’re always able to connect with your prospects, no matter where they are.
And you get to work and communicate with your leads in a way that best suits you and your personal workflow, so it’s a win-win!
Automating Lead Generation with Saved Searches
With such a focus on setting up and using detailed searches to find prospects, it’s common sense you’ll be able to save these searches and pull them up at any time.
Don’t sleep on this feature because it’s one of the most helpful because of this.
There are two ways to go about it.
First, you can simply activate a saved search from the Saved Searches tab whenever you want to have a look at any new prospects or ideas that have come up since you last conducted the search.
Secondly, you can look in your notifications, where the Sales Navigator will tell you how many new results your saved searches have. That’s what I mean by essentially automating lead generation.
You don’t need to look at the searches until you have some results you look at. It’s all within a couple of clicks.
To make the most of this feature, make sure you take the time to set up your searches and then look them over from time to time to spot any trends, patterns, or new prospects that may have come up.
All this comes together to save you time and ensure you never miss out on a hot opportunity.
Avoiding Current Clients and Competitors in Your Searches
Here’s a quick tip to save you time and avoid awkward encounters: use Sales Navigator’s filters to exclude your current clients and competitors from your searches.
Think about it: you don’t want to accidentally reach out to a competitor’s employee or pitch your services to someone who’s already a happy customer.
Here’s how to keep your searches focused on fresh opportunities:
Use the “NOT” operator: Remember Boolean search? Use the “NOT” operator to exclude specific companies or job titles from your search results. For example, “sales manager,” NOT “competitor name,” will show you sales managers who don’t work for your rivals.
Create exclusion lists: Sales Navigator lets you create lists of companies or individuals to exclude from your searches. This is a handy way to keep your prospecting efforts focused on new prospects.
Sending Free InMails to Open Profiles
Open profiles, also known as “open link profiles,” are essentially premium LinkedIn profiles that are happy to have people message them, or they simply forgot to turn off the “receive free InMails from others” feature.
These are profiles that you can InMail without using up an InMail credit, so it’s well worth seeking these out if you want to make the most of your resources. While there’s no dedicated LinkedIn filter for finding open profiles, the Sales Navigator does.
Simply open the search filters, scroll down to the “Open Link” feature, and turn it on (or “Yes”). Just follow these instructions
Open the Lists tab or action queue.
Open the Filters and toggle the Open Link to Yes.
This will display those with an Open Profile.
If you want to only see people with Open Profiles (say you’ve run out of credits), you can toggle the Open Link setting to off (thus hiding those with open profiles), then delete all these entries from your list.
Toggle the Open Link feature back on, and you’ll only have Open Profiles.
By taking advantage of Open Profiles, you can expand your reach and connect with even more potential customers without spending a dime on extra InMails.
Using TeamLink for Warm Introductions
One of the features you may have come across already but not really dived into is one you absolutely want to have in your toolbox, and that’s TeamLink.
TeamLink allows you to add team members and colleagues and then see their network of leads, perhaps people who are being followed or prospects they previously reached out to.
Once you add some people, you can simply apply this filter and see all the leads accessible within your TeamLink network.
Alternatively, when looking through your lead results, you’ll see the TeamLink tab on their profile, displaying information on how this lead is connected to your network.
How does this help you?
Well, if you choose to engage this prospect, you can personalize your outreach to increase your chances of a higher ROI.
Instead of sending a cold InMail, you get a warm intro from a mutual connection.
For example, you could say, “Hey there, I see you’ve spoken to Paul from XYZ, and I’d love to follow up about a new service we’re offering.“
Here’s what the process would look like:
Identify warm leads: Before reaching out to a prospect, check TeamLink to see if anyone on your team is already connected to them.
Request an introduction: If you find a connection, contact your colleague and ask for an introduction. Be sure to give them context about the prospect and why you’re interested in connecting.
Collaborate with your team: TeamLink can also help you identify opportunities for collaboration within your team. Work together to develop a coordinated outreach strategy that leverages each team member’s strengths and connections.
By using TeamLink for warm introductions, you’ll increase your chances of getting a response and building relationships with your prospects.
Tracking Engagement with Account and Lead Insights
And finally, Sales Navigator’s account and lead insights give you a behind-the-scenes look at their activities and engagement. You get to see what actions your prospects are taking, whether they’re interacting with you, and give you some idea of their motives.
Here’s how to use these insights to your advantage:
Track engagement: See who’s viewing your profile, liking your posts, and commenting on your updates. This helps you identify your most engaged prospects and tailor your outreach accordingly.
Measure your success: Analyze your outreach efforts’ performance and identify areas for improvement. This data-driven approach ensures you’re always getting the most out of your Sales Navigator activities.
Stay informed: Keep tabs on your prospects’ job changes, company news, and industry trends. This helps you stay relevant and provide valuable insights during your conversations.
By using account and lead insights, you’ll gain a deeper understanding of your prospects and their needs. This allows you to personalize your outreach, build stronger relationships, and, ultimately, close more deals.
How to Get the Most Out of Sales Navigator
While you surely have your hands full learning the ins, outs, and basics of Sales Navigator, there are a few things you can do to really get the best return and essentially become a true power user.
Think of these as insider tips for squeezing every ounce of value out of this incredible tool:
Make it a daily habit → Don’t just log in to Sales Navigator once a month and expect miracles. Make it a part of your daily routine. Spend a few minutes each day searching for new leads, checking your alerts, and engaging with your prospects. Consistency is key.
Experiment with different filters → Don’t be afraid to get creative with your searches. Try different combinations of filters to uncover hidden gems and find prospects you might have otherwise missed.
Join relevant LinkedIn groups → Connect with potential customers and stay up-to-date on industry trends by joining relevant LinkedIn groups. This is a great way to expand your network and build relationships with key decision-makers.
Share valuable content → Position yourself as a thought leader in your industry by sharing valuable content on LinkedIn. This will attract attention from potential customers and make you more visible in your target market.
Track your progress → Keep an eye on your Sales Navigator metrics to see what’s working and what’s not. This will help you fine-tune your strategy and ensure you always get the most out of your efforts.
Don’t be afraid to ask for help → LinkedIn offers a wealth of resources and support for Sales Navigator users. If you’re stuck or have a question, don’t hesitate to contact their customer support team or consult their online help center.
By following these tips, you’ll transform Sales Navigator from a tool into a trusted partner in your sales success. It’s like having a secret weapon that helps you outsmart the competition and achieve your sales goals faster than ever before.
Final Thoughts
And there you have it—a comprehensive guide to using LinkedIn Sales Navigator like a pro. From setting up your account and customizing your preferences to mastering advanced search techniques and leveraging the power of InMails, these are all the essential tips and tricks to help you unlock your lead generation potential.
Remember, Sales Navigator is just a tool, and it’s up to you to make the most of it.
By staying consistent, using the features to their full potential, and staying up-to-date on the latest tips and tricks, you can transform Sales Navigator into a powerful weapon in your sales arsenal.
Oh, and if you’re ready to take your LinkedIn Sales Navigator game to the next level, you’ll want to hear this.
Reply.io is a supercharged AI tool used by over 3,000 businesses and counting to help automate and accelerate your sales outreach process.
More accurately, it’s a powerful set of tools allowing you to automate even more of the process, extend your reach, and fill your sales pipeline more than is possible with a traditional human team.
We use cookies to enhance your browsing experience, serve personalised ads or content, and analyse our traffic. By clicking "Accept All", you consent to our use of cookies.