Sales Automation. Part 3: Zapier Steps in Reply

Sales Automation. Part 3: Zapier Steps in Reply

Sales automation is not rocket science. You don’t need any sophisticated tools or tech skills to unlock its benefits. Sometimes, a single app (or two) is enough to automate simple workflows across your stack.

This is the perfect case for Reply and Zapier.

Being the ultimate power-user (and one of its most raving fans) I’m always happy to share some of my hacks to help others get the most out of our product. This time, I’d like to show you how to use Zapier to automate certain tasks in your Reply sequences.

So, buckle up and let’s get going! ????

Setting up Zapier Steps in Reply

As I mentioned in the previous article from my Sales Automation series (the one about no-code tools for salespeople), Zapier is one of the most popular workflow automation tools.

In a nutshell, it allows you to connect any and all tools in your sales stack and build conditional automation flows (performing specific actions based on preset parameters or triggers) between two or more of those apps.

As a result, Zapier makes it really easy to automate repetitive tasks.

The good thing is that Reply is one of the 3,000+ apps that work seamlessly with Zapier. What’s even better, you can add Zapier actions as the Steps within your sequences to streamline certain touchpoints or execute tasks outside of Reply (we’ll get to that in detail a bit later).

Here’s a quick guide on how to set up your Zapier steps:

1. Add a Zapier step to a Reply sequence.

Open your sequence and add a Zapier step. Just make sure to consider when you want your Zapier action to trigger. For example, if it’s the first step in the sequence, it will be triggered immediately after each new contact is added to the sequence. If it’s the following one, it will be triggered once the prospect moves to the second step in the sequence, etc.

2. Configure your Zapier step.

This includes creating a Step name (e.g., you can set it as Zapier #1, so each new step will have the next number – Zapier #2, Zapier #3, etc. – assigned to it).

You can also choose between 2 automation options – “Move to next step immediately after this” (set by default) or “Wait for Zapier Action before moving to next step” – to let Zapier know how to handle a step once a contact goes through it.

3. Create a new Zap in Zapier.

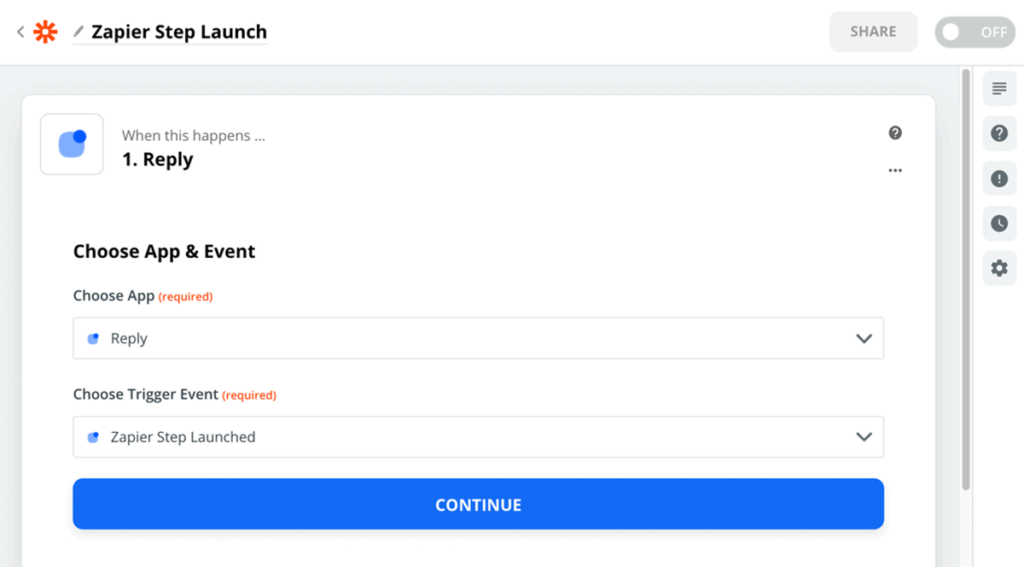
In Zapier, click “Make a Zap” and give your new Zap a name, select Reply as the app, and “Zapier Step Launched” as a trigger event from the drop-down:

At this step, it’s important to specify which sequence the trigger belongs to. To do that, copy the sequence ID from the browser address bar (see the screenshot below) and paste it in the Zapier filter to trigger based on only the Zapier step events launched by the sequence.

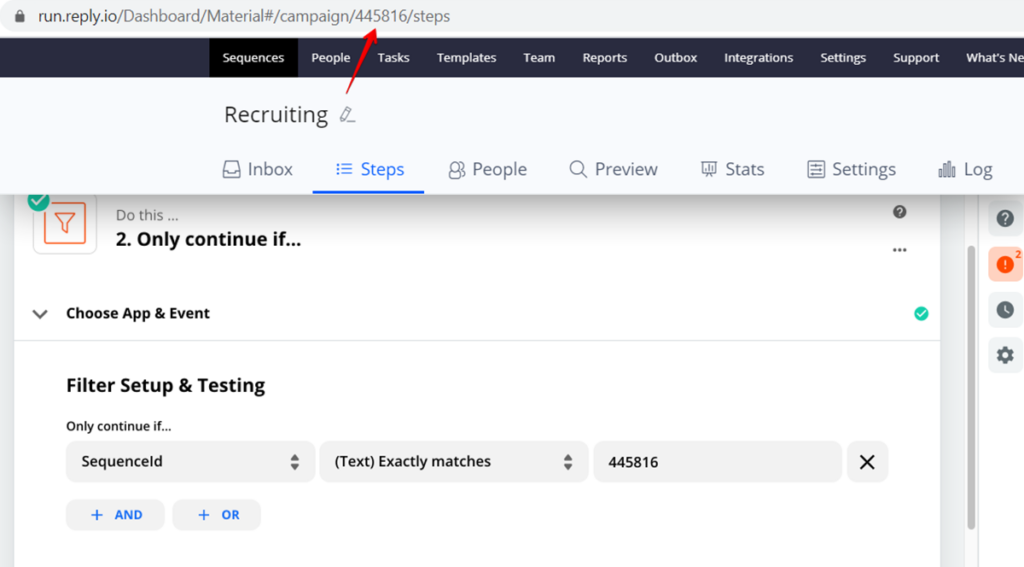
Otherwise, all Zapier steps across all sequences will trigger simultaneously.

Next, select your target app, for example, Clearbit, as well as the desired action event. Map the fields from the launched Zapier step to the fields in your target app and save your Zap.

Not sure how to use Zapier steps in your sequences? Here are some ideas to try out ????.

9 easy-to-implement use cases for Zapier Steps in Reply

Contact enrichment

Need some extra info (in addition to the email address) about your leads down the road, e.g., to personalize your emails, you can use Zapier step to enrich those contacts? You can do that using dedicated third-party services like Clearbit, UpLead, or Dropcontact.

Here’s a sample flow for this use case:

  1. Add the lead to a sequence with Zapier as the first step to execute right away.
  2. Using the lead’s email or domain, Zapier calls services like Clearbit for more info to enrich the contact.
  3. Once the data is acquired, Zapier will update the lead profile in Reply, adding new fields that we will be using in our outreach.
  4. The lead then moves to step #2, e.g., “send email” where we can use the extra info as the personalization variables for our template.

Find direct phone numbers

If you’re using our Chrome extension, you should know how good it is at finding emails. But if you’re building a multichannel sequence, a simple email isn’t enough. You’ll need phone numbers too (which we can’t provide, at least for now).

Here’s a sample flow of how a Zapier step can help you get phone numbers.

  1. Use name2email or Reply Data to find the lead’s email address and push those leads to the sequence.
  2. Send an email as the first step in the sequence.
  3. Add Zapier as the second step to call third-party services (AeroLeads, Dropcontact, Seamless.ai) for the phone number.
  4. Update the lead profile in Reply with the phone number.
  5. Make a call is the next step in the sequence (you can use our extension for this as well).

Zapier SMS and phone call step (if needed)

Of course, Reply comes with the built-in dialer and SMS sending capabilities. But if you need to use a third-party platform for some reason, Zapier can help.

Create a step to send your leads to your cloud calling or SMS platform (e.g., Twilio, MessageBird) at some point in your sequence to execute those touchpoints and still keep sending emails from Reply.

Update your CRM

Zapier makes it a ton easier to keep the data consistent across your sales stack. This is especially useful if your CRM doesn’t have a native integration with Reply.

Just add a task to sync the prospects from Reply to your CRM as the first step in your sequence to have the data automatically updated.

You can also send the data between your CRM and Reply using the available native integrations (including HubSpot, Salesforce, Pipedrive, etc.)

Ads and account-based marketing

You can also use Zapier to augment your cold outreach with the account-based marketing/sales tactics.

For example, you can automatically re-target your audience using LinkedIn or Facebook ads. To do that, create a Zapier step in your Reply sequence to sync your lead info (email, LinkedIn URL, company name) to the corresponding software.

Growth hacking automation

If your workflows are even more complex and you run truly multichannel sequences using platforms like Twitter, Facebook, or Instagram, Zapier can help streamline these steps too.

All you need to do is send your leads to the growth hacking tools like Phantombuster or TexAU and let them do their magic. BTW, we have a direct TexAU integration you can use as well.

Swag outreach

In case you’re after some really big deals or selling to an enterprise-grade customer, you know how to work with such leads 😉 One of the proven tactics for getting their attention is direct mail outreach.

The flow here is very similar to the previous use cases — add a Zapier step to your sequence —> send the lead info to services like Sendoso (and let it do the job here) —> in your next email make sure to mention that you’ve sent them a note and ask if they have received it.

Email Verification

You know that Reply has a built-in email verification feature, right? If you still prefer using a third-party tool for that, this Zapier use case is for you.

  1. Add a lead to a Reply sequence with Zapier task as the first step.
  2. Zapier grabs your lead and sends it to the email verification service of your choice.
  3. Using Paths by Zapier, you can further route the lead depending on the results of this step:
    – If the email is valid, move the lead to the next step in the sequence,
    – If the email is invalid, remove the lead from the sequence.

In the second case, it also makes sense to save the leads with invalid email addresses to a separate Google Sheet or a dedicated list in your CRM to review and enrich their contacts later.

Activity-based sequences

Leads who regularly open and interact with your emails but never reply are the worst! But at least they are giving you a clear signal that what you’re offering isn’t completely irrelevant to them. So make sure to grab this chance.

Here’s a quick idea to re-engage your most active leads. ????

  1. Send 3-4 emails through Reply sequence.
  2. As the fifth step, add a Zapier task using the Zapier Filter function and a Reply field called Email Views. You can set the filter to equal “more than 10” and use Paths by Zapier.
    – If the condition is true (your lead has viewed your email more than 10 times), it will move the lead to a more personalized sequence or trigger some other engagement scenario.
    – If the number of email views is less than 10, the lead will be moved to the next step in the same sequence.

Wrapping up

These are the 9 types of Zapier steps we’re currently using in our sequences. And let me tell you, this makes our lives in the Reply SDR department so much easier!

While there are more useful Zaps to explore, the ideas listed above can be a solid starting point on your automation journey. Hopefully, this will help you enrich your sequences, streamline your workflows, and make your life as an SDR a bit easier.

Make sure to check back soon for other sales automation hacks and inspiration ????

Subscribe to our blog to receive the latest updates from the world of sales and marketing.
Stay up to date.

Related Articles

The 5 Best Lead Management Software in 2024: Streamline Your Sales Process

The 5 Best Lead Management Software in 2024: Streamline Your Sales Process

The 5 Best Lead Management Software in 2024: Streamline Your Sales Process
Upselling and Cross-selling: The Go-To Guide [+7-Step Framework Inside]

Upselling and Cross-selling: The Go-To Guide [+7-Step Framework Inside]

Upselling and Cross-selling: The Go-To Guide [+7-Step Framework Inside]
Lead Scoring Secrets: How to Identify Your Best Prospects In 8 Steps

Lead Scoring Secrets: How to Identify Your Best Prospects In 8 Steps

Lead Scoring Secrets: How to Identify Your Best Prospects In 8 Steps